For many drivers, a dash cam is an indispensable co-pilot, offering peace of mind and crucial evidence in unforeseen events. While plugging into the 12V socket works, hardwiring provides a much cleaner installation and unlocks essential features like parking surveillance. However, the thought of hardwiring often brings a nagging question: “Will this void my car’s warranty?” The good news is, with the right approach and a little knowledge, you can typically hardwire your dash cam safely without jeopardizing your vehicle’s factory warranty.
This guide will demystify the process, offering practical steps and expert advice to ensure your dash cam installation is both effective and warranty-friendly. We’ll cover everything from understanding your car’s warranty to a detailed installation walkthrough, empowering you to enjoy the full benefits of your dash cam without unnecessary worry.
Understanding Car Warranties and Dash Cam Installation
The fear of voiding a car’s warranty often stems from a misunderstanding of how warranties actually work. A common misconception is that any aftermarket modification automatically voids your entire car warranty. This is generally not true. In the United States, for instance, the Magnuson-Moss Warranty Act states that a manufacturer cannot void a warranty simply because an aftermarket part has been installed. Instead, the warranty can only be voided for specific parts or systems if the aftermarket installation directly causes damage to those parts.
When it comes to hardwiring a dash cam, the critical distinction lies between cutting into your car’s existing wiring and simply adding to an existing circuit. If you cut or splice into the car’s original electrical components, you could certainly void the warranty for that specific electrical system if an issue arises from your modification. However, proper hardwiring typically involves using fuse taps to connect to the fuse box, which adds an extra circuit without altering the car’s original wiring. This method is generally considered safe and less likely to impact your warranty. Still, if an electrical problem occurs, the burden of proof may fall on the dealership to demonstrate that your dash cam installation was the direct cause.
Why Hardwire Your Dash Cam? The Unseen Benefits
While a standard 12V plug-in offers basic functionality, hardwiring elevates your dash cam experience with several significant advantages:
- Clean and Discreet Installation: Say goodbye to dangling wires and occupied cigarette lighter sockets. Hardwiring routes all cables neatly behind trim panels, offering a factory-fitted aesthetic that keeps your dashboard clutter-free.
- Uninterrupted Parking Surveillance: This is arguably the biggest draw of hardwiring. By connecting directly to your car’s power, your dash cam can operate in parking mode, recording incidents even when your car is turned off. This feature is invaluable for capturing hit-and-runs, vandalism, or other unfortunate events that occur while your vehicle is parked.
- Free Up Your 12V Outlet: With your dash cam drawing power from the fuse box, your auxiliary power outlet remains free for charging phones, GPS devices, or other accessories.
- Reliable Power Supply: A hardwired connection ensures a consistent power supply, reducing the risk of your dash cam losing power due to a loose connection or accidental unplugging.
Essential Tools and Materials for a Safe Hardwire Installation
Before you begin, gather the necessary tools and materials to ensure a smooth and professional installation. Having everything at hand will prevent interruptions and make the process more efficient:
- Dash Cam Hardwire Kit: This specialized kit is crucial. It typically includes a voltage converter (to step down your car’s 12V to the 5V or 3.3V your dash cam needs), a low-voltage cutoff feature, and fuse taps. Ensure it’s compatible with your dash cam model.
- Fuse Taps (Add-a-Circuit): These clever devices allow you to safely tap into an existing fuse slot without cutting wires. You’ll need two: one for a constant power source and one for a switched power source. Make sure they match your car’s fuse type (e.g., ATO/ATC, Mini, Low Profile Mini, Micro2).
- Automotive Fuses: You’ll need extra fuses for the fuse taps, matching the amperage of the circuit you’re tapping into, plus one for the dash cam itself (typically 2-5A).
- Multimeter/Circuit Tester: Essential for identifying constant and switched fuse slots in your fuse box.
- Trim Removal Tools: Plastic pry tools are vital for safely prying open interior panels and tucking away wires without damaging plastic or paint.
- Wire Strippers/Crimpers: For preparing the hardwire kit’s wires and connecting them to the fuse taps.
- Zip Ties or Cable Clips: For securing excess wiring and ensuring a tidy installation.
- Electrical Tape: For insulating connections.
- Socket Wrench or Screwdriver: To remove the ground bolt.
- Headlamp or Flashlight: For working in dimly lit areas.
Step-by-Step Guide to Hardwiring Your Dash Cam Safely
Executing the hardwiring process meticulously is key to both functionality and warranty protection. Follow these steps carefully:
1. Plan Your Installation and Cable Routing
First, determine the best location for your dash cam on the windshield, usually behind the rearview mirror for an unobstructed view and discreet placement. Next, plan the cable routing. You’ll typically route the power cable along the headliner, down the A-pillar, and to your car’s fuse box, which is often located under the dashboard or in the glove compartment. The ground wire will connect to a metal bolt on the car’s chassis. Visualize the path to ensure sufficient cable length and a clean, hidden look.
 Dash cam discreetly installed behind rearview mirror, showing power cable being routed along headliner.
2. Locate Your Car’s Fuse Box and Identify Power Sources
Refer to your car’s owner’s manual to find the fuse box location and its diagram. You’ll need to identify two types of power:
- Constant Power (BAT): This fuse provides continuous power, even when the ignition is off. It’s essential for parking mode. Common constant fuses are for the hazard lights, interior lights, or radio.
- Switched Power (ACC): This fuse only provides power when the ignition is on. It’s used to tell the dash cam to switch from parking mode to driving mode. Fuses for the radio, cigarette lighter, or wipers are often switched.
Using a Multimeter: With your ignition off, use a multimeter to test each fuse. For constant power, the multimeter should show 12V with the ignition off. For switched power, it should show 0V with the ignition off and 12V with the ignition on. It is highly recommended to use an empty fuse slot if available, or tap into a circuit that isn’t critical to vehicle safety or operation, such as the radio or a spare accessory port.
3. Connect the Hardwire Kit Using Fuse Taps
Once you’ve identified suitable fuse slots:
- Insert Fuses into Fuse Taps: Each fuse tap has two slots. Insert the original fuse for the circuit you’re tapping into into the lower slot. Insert a new, lower-amperage fuse (e.g., 2A-5A, supplied with your hardwire kit) for the dash cam into the upper slot.
- Connect Hardwire Kit Wires: Crimp the red wire (constant power) from your hardwire kit to one fuse tap and the yellow wire (switched power) to the other.
- Insert Fuse Taps: Plug the fuse taps into the identified constant and switched fuse slots in your car’s fuse box.
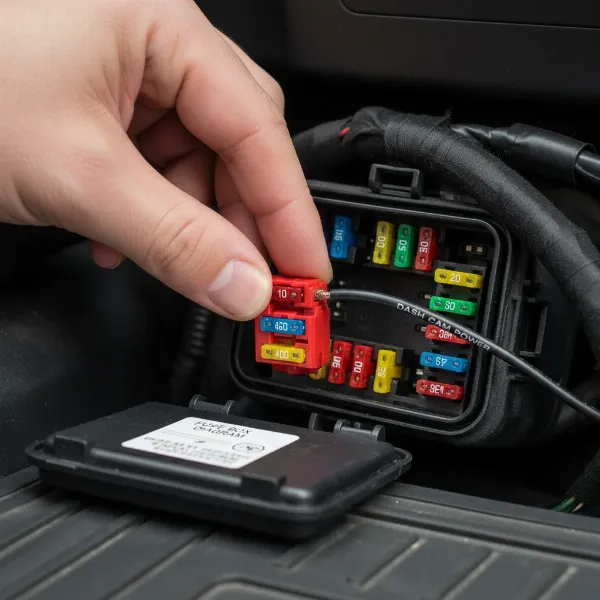 Hand inserting a fuse tap with two fuses into a car's fuse box, demonstrating proper hardwiring technique.
4. Ground the Wire
The black wire from your hardwire kit is the ground wire. Find a metal bolt or screw on the car’s chassis that is painted or unpainted metal, close to the fuse box. Loosen the bolt, place the U-shaped connector of the ground wire under it, and tighten the bolt securely. Ensure a good metal-to-metal connection for proper grounding.
5. Test the Dash Cam
Before concealing any wires, connect your dash cam to the hardwire kit. Turn on your car’s ignition and ensure the dash cam powers on and starts recording. Then, turn off the ignition and lock the car; the dash cam should switch to parking mode (if equipped) and eventually power off or enter a low-power recording state based on its settings. This confirms both constant and switched power connections are correct.
6. Route and Conceal Wires
Once tested, carefully route and conceal the power cable using your trim removal tools. Tuck the cable neatly along the headliner, down the A-pillar, and behind the dashboard panels to the fuse box. Use zip ties or cable clips to secure any loose wiring under the dash, keeping it away from pedals and moving parts.
Critical Considerations for Warranty Protection
While the steps above outline a safe hardwiring process, keeping specific warranty considerations in mind can save you headaches down the road.
- Never Cut Original Wires: This is the golden rule. Any modification that involves splicing into or cutting your car’s factory wiring can directly void the warranty on that specific electrical component if damage occurs. Fuse taps are designed to bypass this risk.
- Set Proper Voltage Cut-off: Most hardwire kits include a low-voltage cutoff feature to prevent battery drain. It’s crucial to set this correctly, ideally at 12V or higher for modern vehicles. Many older dash cam defaults (11.4V-11.6V) are too low for newer car batteries and could lead to excessive battery discharge, potentially causing issues that might be attributed to the dash cam and impact warranty claims related to the battery.
- Choose the Right Fuse Slots: Avoid tapping into fuses that control critical safety systems like airbags, ABS, or engine management. Stick to non-essential circuits like the radio, cigarette lighter, or empty slots. This minimizes the risk of interfering with vital vehicle functions.
- Consider Professional Installation: If you’re unsure about the process, or if your vehicle has a particularly complex electrical system, investing in professional installation is a wise choice. A reputable, insured technician will have the expertise to install the dash cam correctly, minimize risks, and potentially offer a warranty on their work. Some authorized dealerships may even offer dash cam installation, which can provide additional peace of mind regarding your car’s warranty.
- Keep Documentation: Retain all receipts for your dash cam and hardwire kit, along with any installation records. This documentation can be valuable if you ever need to discuss the installation with your dealer regarding a warranty claim.
- Consult Your Dealer (Optional but Recommended): If you are particularly concerned, a brief conversation with your car dealership’s service department before installation can clarify their specific policies on aftermarket electronics. While they might discourage it, understanding their stance can help you make an informed decision.
Common Mistakes to Avoid
Even with the best intentions, small errors can lead to big problems. Be aware of these common pitfalls:
- Incorrect Fuse Selection: Using a fuse tap in the wrong direction or selecting a fuse for a critical system can lead to malfunctions. Always double-check your fuse diagram and use a multimeter.
- Poor Grounding: A weak or incorrect ground connection can cause intermittent power issues, flickering, or even prevent your dash cam from turning on. Ensure the ground wire is securely attached to a clean, unpainted metal surface.
- Ignoring Voltage Cut-off Settings: Failing to set the low-voltage cutoff correctly can lead to a drained car battery, especially if you rely heavily on parking mode. This could potentially cause battery-related issues that might complicate warranty claims.
- Interfering with Airbags or Sensors: When routing wires, be extremely careful not to obstruct airbags, seatbelt pretensioners, or any vehicle sensors. This is a critical safety concern and could also affect warranty claims related to safety systems.
“When hardwiring a dash cam, the goal isn’t just a clean install; it’s about smart power management and respecting your vehicle’s electrical architecture. Always prioritize using appropriate hardwire kits with reliable voltage protection and avoid cutting factory wires to maintain warranty integrity.” – John Smith, Automotive Electrical Specialist
Conclusion
Hardwiring a dash cam is an excellent way to integrate this essential safety device seamlessly into your vehicle, providing constant surveillance and a tidy interior. While concerns about voiding your car’s warranty are valid, understanding the nuances of warranty policies and adhering to best practices can significantly mitigate this risk. By using fuse taps, selecting appropriate power sources, setting proper voltage cutoff, and meticulously routing your cables, you can achieve a professional-grade installation that protects both your dash cam and your car’s warranty. Remember, a well-informed approach ensures peace of mind on every journey, knowing your vehicle is secure and its warranty intact.
Are you ready to take the plunge and hardwire your dash cam for ultimate peace of mind?
Frequently Asked Questions
Does hardwiring a dash cam automatically void my entire car warranty?
No, hardwiring a dash cam generally does not automatically void your entire car warranty. Warranties typically specify that only components or systems directly damaged by an aftermarket installation can have their warranty voided. If you use proper techniques like fuse taps without cutting original wires, the risk to your warranty is minimal.
What is the Magnuson-Moss Warranty Act, and how does it relate to dash cams?
The Magnuson-Moss Warranty Act is a U.S. federal law that protects consumers. It states that a manufacturer cannot require you to use only their branded parts or service to keep your warranty valid. This means your warranty generally cannot be voided just for installing an aftermarket dash cam, unless the installation directly caused a specific failure.
What are fuse taps, and why are they important for warranty protection?
Fuse taps (also known as add-a-circuit) are devices that allow you to safely draw power from an existing fuse slot in your car’s fuse box without cutting or splicing into the original wiring. This method is crucial for warranty protection because it adds a new circuit, rather than modifying the factory electrical system, thereby reducing the risk of warranty invalidation.
What should I set my dash cam’s low-voltage cutoff to?
For most modern vehicles, it’s recommended to set your dash cam’s low-voltage cutoff to 12V or higher. This ensures that your Dash Cam stops drawing power before your car’s battery voltage drops to a level that could prevent your vehicle from starting, protecting your battery and potentially avoiding warranty issues related to battery drain.
Is professional installation always necessary to protect my warranty?
Professional installation isn’t always necessary, but it is highly recommended if you are uncomfortable with electrical work or if your car has complex systems. A reputable, insured professional can ensure the installation is done correctly, minimizing the risk of damage and potential warranty issues. Some authorized dealers even offer installation services.