A dash cam is an invaluable co-pilot, capturing every moment on the road and providing crucial evidence when you need it most. However, the benefits often come with a minor aesthetic headache: visible wires cluttering your car’s interior. Dangling cables can not only be an eyesore but also a dangerous distraction. If you’re looking to achieve that sleek, integrated feel for your dash cam setup, you’ve come to the right place. As a technician with over a decade of hands-on experience in the dash cam world, I’m here to guide you through the process of discreetly hiding those wires, ensuring your vehicle remains neat, safe, and ready for any journey.
Why Conceal Dash Cam Wires? Beyond Just Aesthetics
While a clean look is certainly a major motivator, hiding your dash cam wires offers several practical advantages that extend far beyond mere aesthetics.
First and foremost, it significantly improves safety. Loose wires can obstruct your view, snag on controls, or become tangled, creating dangerous distractions that pull your focus from the road. Tucking them away ensures an unobstructed line of sight and a safer driving environment. Secondly, proper wire management protects your investment. Exposed cables are vulnerable to accidental damage from passengers, luggage, or even curious pets. Securely routed wires are less likely to be pinched, pulled, or worn out, extending their lifespan and maintaining reliable power to your device.
Furthermore, a tidy installation enhances dash cam functionality. When wires are properly secured, there’s less risk of accidental disconnection, ensuring your camera is always recording when you need it most. For those utilizing advanced features like parking surveillance, a hardwired and hidden setup is often essential for continuous power, even when the engine is off. Lastly, it simply elevates your car’s interior. A professional-looking dash cam installation makes your vehicle feel more organized and refined, seamlessly integrating technology without the visual clutter.
Essential Tools for a Seamless Installation
Achieving a clean, hidden dash cam wire setup doesn’t require a professional mechanic, but having the right tools makes the process significantly smoother and prevents accidental damage to your vehicle’s trim.
The most crucial item is a trim removal tool kit. These plastic pry tools allow you to gently separate interior panels, lift weather stripping, and tuck wires without scratching or marring your car’s surfaces. Avoid using metal screwdrivers, as they can easily leave permanent marks. Adhesive wire clips are incredibly useful for securing cables in areas where panels can’t be lifted or for reinforcing routes. They stick firmly to plastic or fabric surfaces, keeping wires snug. Electrical tape and zip ties are also indispensable for bundling excess cable, securing connections, and preventing wires from rattling or coming loose.
For a truly integrated solution that allows for parking mode functionality, a dash cam hardwire kit is essential. This kit typically includes a fuse tap, allowing you to connect your dash cam directly to your car’s fuse box, bypassing the cigarette lighter and ensuring constant power. Finally, a cleaning cloth is often overlooked but important. Wiping down surfaces before applying adhesive clips ensures maximum adhesion.
Step-by-Step Guide to Hiding Dash Cam Wires
Transforming a dangling mess into a discreet installation is a straightforward process when approached systematically. Follow these steps for a clean dash cam setup.
Mount Your Dash Cam Strategically
|
Our Picks for the Best Dash Cam in 2026
As an Amazon Associate I earn from qualifying purchases.
|
||
| Num | Product | Action |
|---|---|---|
| 1 | Dual 4K Dash Cam Front and Rear - Free 64G SD Card, 2160P+2160P UHD Dash Camera for Cars, Dashcam with 176°+160° Wide Angle, 3.5'' IPS Screen Dashcam, G-Sensor, WDR, Night Vision, 24H Parking Monitor |

|
| 2 | 4K Dash Cam Front, Built-in 5G WiFi, 64GB Card Included, Dash Camera for Cars, Mini Dashcam with Super Night Vision, Loop Recording, G-Sensor, 24 Hours Parking Monitor, Support 256GB Max |
|
| 3 | Dash Cam Front and Rear, 2.5K Dual Dash Camera for Cars, 2560P Mini Car Camera, 2 inch IPS Screen, 32GB Card Included, WDR Night Vision, 24 Hours Parking Monitor, G-Sensor, Support 256 GB Max |
|
| 4 | Garmin Dash Cam™ Mini 3, Ultracompact 1080p HD Dash Cam with a 140-degree Field of View, Built in Clarity™ Polarizer, Voice Controlled, Automatic Recording |
|
| 5 | ROVE R2-4K DUAL Dash Cam Front and Rear, STARVIS 2 Sensor, FREE 128GB Card Included, 5G WiFi - up to 20MB/s Fastest Download Speed with App, 4K 2160P/FHD Dash Camera for Cars, 3" IPS, 24H Parking Mode |
|
| 6 | REDTIGER 4K Dash Cam Front Rear, STARVIS 2 Sensor, Free Card Included, 5.8GHz WiFi-20MB/s Fast Download, Dash Camera for Cars with GPS, WDR Night Vision, 170°Wide Angle, 24H Parking Mode(F7NP) |
|
| 7 | VIOFO A229 Plus Dash Cam Front and Rear, Dual STARVIS 2 Sensors, 2 Channel HDR, 1440P+1440P Voice Control Car Dash Camera, 5GHz Wi-Fi, Voice Control, Ultra-Precise GPS |
|
| 8 | 4K+4K Dash Cam Front and Rear, Free 128GB Card Included, 5.8GHz WiFi Dash Camera for Cars, Built-in GPS, G-Sensor, 170°Wide Angle, 3" IPS Screen, 24H Parking Mode, Support 512GB Max |
|
| 9 | Dash Cam Front and Rear, 1080P Dash Camera for Cars, 3 Channel Car Camera Front Rear and Inside with 32GB Card, Loop Recording, Night Vision, HDR, 24Hr Parking, G-Sensor |
|
| 10 | WOLFBOX G840S 12" 4K Mirror Dash Cam Backup Camera, 5.8GHz WiFi Smart Rearview Mirror for Cars & Trucks, Front and Rear View Dual Cameras, Night Vision, Parking Assistance, Included 32GB Card & GPS |
|
Before tackling wires, decide on your dash cam’s optimal placement. The ideal spot is usually behind your rearview mirror, high on the windshield. This position provides a clear view of the road without obstructing your driving visibility. Ensure the camera angle covers the entire road ahead and doesn’t create blind spots. Use your dash cam’s live view feature, often accessible via a smartphone app, to verify the camera’s field of view before permanently securing it. Clean the windshield thoroughly before attaching any mounts for the best possible adhesion.
Plan Your Wiring Route
This is perhaps the most critical preparatory step. Visualize the path the power cable will take from your dash cam to its power source (either the cigarette lighter or the fuse box). A common route involves running the wire along the top of the windshield, down the passenger-side A-pillar, and then under the dashboard. For a rear dash cam, the cable will extend from the front unit, typically along the headliner, down a C or D pillar, and to the rear window. Planning minimizes frustration and helps identify potential challenges, such as tight spots or airbag locations.
Tuck Wires Along the Headliner
Starting from your mounted dash cam, gently push the power cable into the gap between the windshield and the vehicle’s headliner (the fabric ceiling). Use your plastic trim removal tool or even just your fingers to carefully tuck the wire. Be patient and avoid using excessive force, as metal tools can tear the fabric or damage the plastic trim. Work your way across the top of the windshield towards the passenger side of the vehicle.
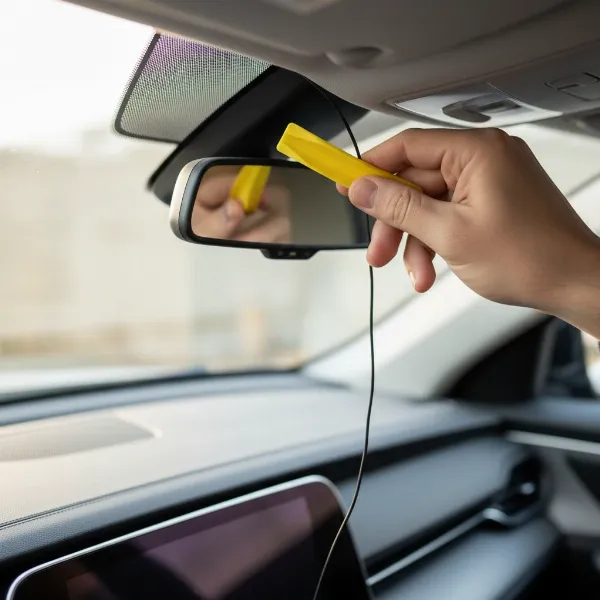 A hand using a plastic trim tool to tuck a dash cam wire into the car's headliner near the windshield for a hidden installation
Route Down the A-Pillar (Mind the Airbags!)
Once you reach the passenger-side A-pillar (the vertical pillar between the windshield and the front passenger door), you’ll continue routing the wire downwards. This panel often has a slight gap where the cable can be tucked. In some vehicles, you may need to gently pry open the A-pillar trim using your plastic tool. Crucially, be extremely careful not to interfere with side curtain airbags, which are often located behind this panel. The safest practice is to route the cable behind the trim but in front of the airbag channel. If you’re unsure, consult your car’s manual or a professional.
Continue Under the Dashboard and Along Door Seals
After navigating the A-pillar, guide the cable under the glove box or dashboard area. You can often tuck it into existing gaps or secure it with zip ties to other factory wiring harnesses – this is a good indicator of safe routing paths. For longer runs, such as connecting a rear dash cam, you might continue routing the cable along the door sills (by gently pulling up the weather stripping), or even under floor mats and panels. This keeps the cable completely out of sight and prevents it from interfering with passenger comfort.
Connecting to Power: Cigarette Lighter vs. Hardwiring
The final step is connecting to your power source.
- Cigarette Lighter (12V/24V Socket): This is the simplest method. Route any excess cable, bundle it neatly with a zip tie, and tuck it away under the dash or glove box before plugging into the socket. While easy, it leaves the socket occupied and typically doesn’t support parking mode when the car is off.
- Hardwiring to the Fuse Box: For a cleaner, permanent installation and enabling parking surveillance, use a hardwire kit. This involves connecting directly to your car’s fuse box using a fuse tap. Ensure you tap into a circuit that provides power as needed (constant power for parking mode, accessory power for ignition on). If uncomfortable working with your car’s electrical system, consider professional installation for hardwiring.
Managing Excess Cable
Dash cam cables are often generously long to accommodate various vehicle sizes. Once you’ve routed the wire to your power source, you’ll likely have some excess. Avoid leaving it bunched up near the camera, as this can look messy and even create rattles. Instead, coil any extra length neatly and secure it with zip ties. The best place to hide this coiled excess is usually under the glove box or behind a removable panel in the footwell, where there’s typically ample space.
Test Your Setup
Before buttoning everything up and celebrating your clean install, always test your dash cam. Start your vehicle to ensure the camera powers on correctly. Check the camera’s display or app to confirm it’s recording as expected and that all features (like parking mode, if hardwired) are functioning. Make sure the cable isn’t pulled tight or stressed by steering wheel movement or seat adjustments. Once you’ve verified everything works, you can confidently secure all panels and trims.
Special Considerations for Different Vehicles
While the core principles remain consistent, different vehicle types might require slight adjustments to your wire-hiding strategy.
For hatchbacks, SUVs, and trucks, installing a rear dash cam often involves a longer cable run. When routing through the rear hatch, it’s crucial to pass the wire through the existing rubber seals or conduits designed for factory wiring. Always leave a small amount of slack wire near hinges or moving parts to prevent the cable from being pulled tight and damaged each time the hatch opens or closes. For larger vehicles with more interior space, you might find more flexibility in tucking wires under floor panels or within larger plastic trim pieces. Conversely, smaller vehicles may require more careful planning to manage excess cable in compact spaces.
Expert Tips for a Professional Finish
Achieving a truly professional-looking dash cam installation is a matter of attention to detail and patience.
- Patience is Key: Don’t rush the process. Take your time to carefully tuck each section of wire and gently remove/replace trim pieces. Forcing anything can lead to damage.
- Follow Factory Wiring Paths: When possible, try to route your dash cam cables alongside existing factory wiring harnesses. Car manufacturers design these paths to be safe and out of the way of moving parts and airbags.
- Avoid Sharp Bends: Kinking or sharply bending cables can damage the internal wiring, potentially leading to connection issues or signal loss. Keep all bends smooth and gradual.
- Leave Slack Where Needed: As mentioned, leaving a little slack at hinge points is vital. Similarly, ensure there’s enough slack near the camera itself so it can be easily removed or adjusted without straining the cable.
- Cleanliness Matters: Before affixing any adhesive clips or tape, ensure the surfaces are clean and free of dust or grease for optimal bonding.
“A well-hidden dash cam is more than just aesthetically pleasing; it’s a testament to a driver’s commitment to both safety and vehicle upkeep.” – Admin, Dashcamon.com, Dash Cam Expert
Conclusion
A dash cam is an essential guardian on the road, and its presence shouldn’t come at the cost of your car’s interior aesthetics or your driving focus. By taking the time to properly hide dash cam wires, you’re not only enhancing the visual appeal of your vehicle but also improving safety by eliminating distractions and protecting your valuable device from wear and tear. A meticulous installation ensures seamless operation, especially for features like parking surveillance, and provides a truly integrated, factory-like feel.
Ready to transform your dash cam setup from an obvious gadget into an integrated guardian? With a few simple tools and a little patience, a clean and professional look is well within reach. What’s your biggest challenge when it comes to keeping your car’s interior tidy?
Frequently Asked Questions
What tools do I absolutely need to hide dash cam wires?
For basic wire hiding, a plastic trim removal tool is highly recommended to safely pry open panels. Adhesive wire clips and electrical tape are also very useful for securing cables and bundling excess. If hardwiring, a hardwire kit with fuse taps will be necessary.
How do I avoid interfering with airbags when routing wires?
When routing wires down the A-pillar, it’s crucial to be aware of the side curtain airbags often located behind these panels. Always route the Dash Cam cable behind the trim but in front of the airbag channel to ensure it does not impede airbag deployment in an accident. If uncertain, consult your vehicle’s manual.
Can I hide dash cam wires without removing any car panels?
Yes, in many cases, you can hide wires by simply tucking them into the gaps between the headliner and windshield, or along the edges of the A-pillar and door seals. While a trim removal tool makes the process easier and cleaner, careful use of your fingers can often achieve a discreet setup without fully removing panels.