Driving a hatchback or SUV offers unparalleled versatility and space, but it also presents unique challenges when it comes to vehicle security and visibility, particularly in the rear. Installing a rear dash cam is a proactive step to enhance your safety, provide crucial evidence in case of incidents, and even monitor your vehicle while parked. While the prospect of wiring a camera through a liftgate might seem daunting, it’s a perfectly achievable DIY project with the right approach and tools. This comprehensive guide will walk you through every step, ensuring a clean, secure, and effective installation for your hatchback or SUV.
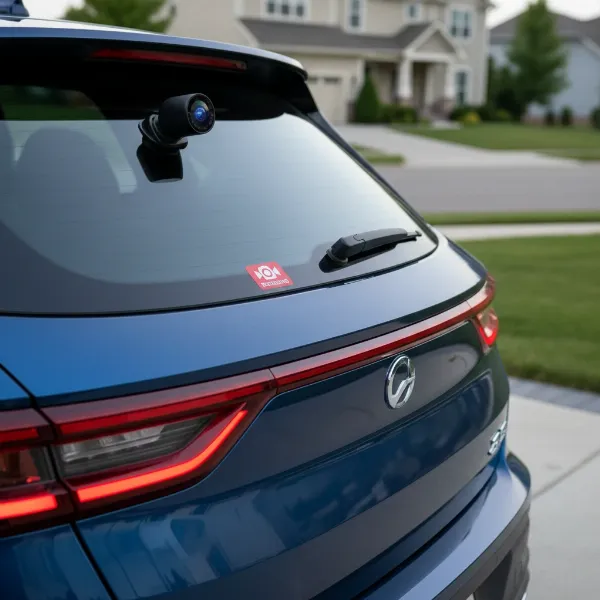 Rear dash cam installed on a hatchback SUV for enhanced security and rear visibility.
Why a Rear Dash Cam is Essential for Hatchbacks & SUVs
Hatchbacks and SUVs, with their larger rear profiles and often obstructed rear visibility, greatly benefit from a dedicated rear dash cam. These cameras provide a vital second perspective, capturing footage of rear-end collisions, documenting hit-and-runs in parking lots, and deterring potential theft. For vehicles with a moving liftgate, a properly installed rear camera ensures continuous, stable recording, unlike temporary solutions. The added layer of security and peace of mind a dual-channel dash cam system provides is invaluable on today’s busy roads.
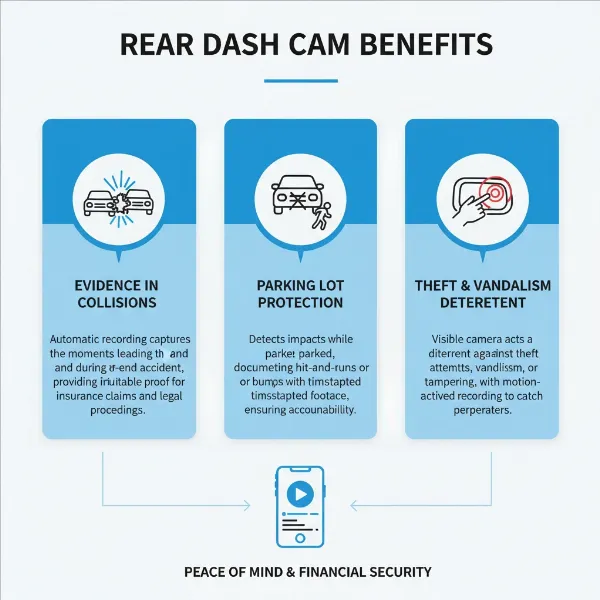 Diagram illustrating benefits of rear dash cam: collision evidence, parking lot monitoring, theft deterrence.
Essential Tools and Materials for Installation
Before you begin, gather the following tools and materials to ensure a smooth installation process:
- Your Dash Cam Kit: Includes the rear camera, connecting cable, and often adhesive mounts.
- Plastic Trim Removal Tools: Essential for safely prying open interior panels without causing damage. Avoid metal tools that can scratch your vehicle’s interior.
- Cable Clips or Zip Ties: To secure excess wiring and maintain a tidy appearance.
- Rubbing Alcohol and Microfiber Cloth: For cleaning mounting surfaces.
- Fish Wire (e.g., Coat Hanger, Long Zip Tie, or Electrical Fish Tape): Crucial for routing cables through tight spaces, especially the rubber conduits of the liftgate.
- Electrical Tape: To protect cable connectors when routing through tight spaces and to secure wiring.
- Cable Lubricant or Hand Soap (Optional): Can aid in pulling cables through tough conduits.
- Measuring Tape: To estimate cable lengths.
- Owner’s Manual: For vehicle-specific wiring diagrams or panel removal instructions.
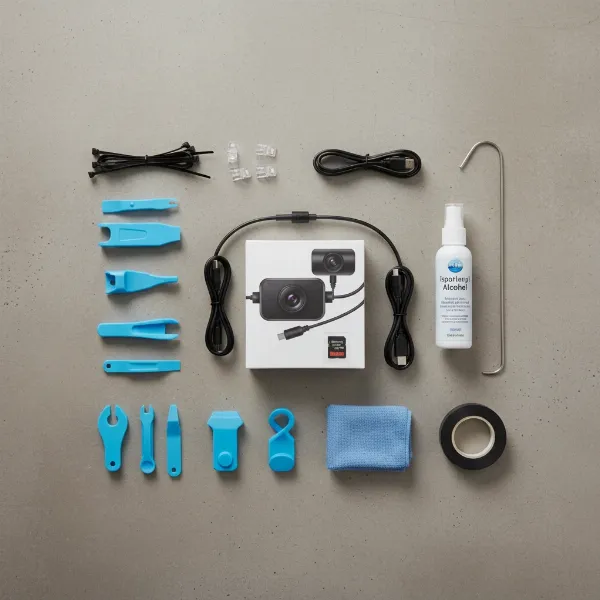 Essential tools for rear dash cam installation: trim removal tools, zip ties, fish wire, electrical tape.
Strategic Placement: Where to Mount Your Rear Camera
Choosing the right mounting spot for your rear dash cam is critical for optimal coverage and adherence to local regulations.
Mount the rear dash camera on the center of the rear windshield, high enough to capture a broad view of the road behind you. While it’s best to avoid rear defroster grid lines if possible, mounting on them is generally acceptable if careful removal is ensured later. Always check the live view on your front dash cam unit or smartphone app to confirm the camera’s angle covers adequately and is not obstructed by the rear wiper’s path or any tint lines. Ensure the camera is mounted securely in a location where it won’t move excessively as the liftgate opens and closes. In some regions, there are specific laws regarding dash cam placement, so it’s wise to review local regulations to ensure your setup is compliant.
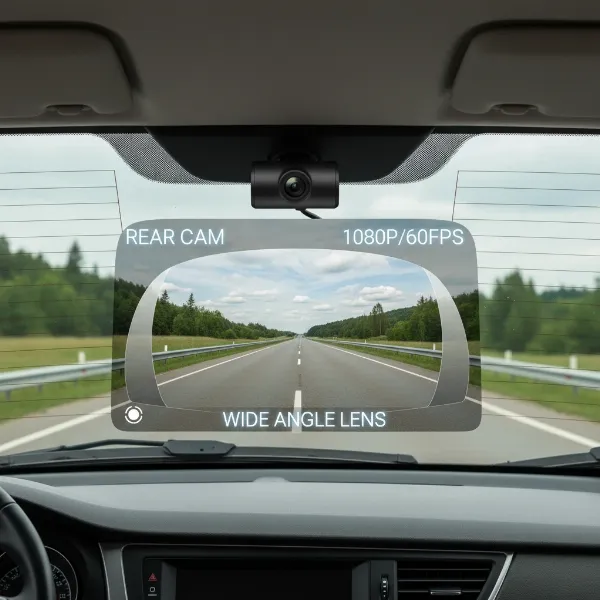 Rear dash cam mounted centrally on SUV's rear windshield, showing wide view.
Step-by-Step Installation Guide
Installing a rear dash cam in a hatchback or SUV requires careful attention to cable routing, especially through the flexible conduit of the liftgate.
1. Preparation and Initial Mounting
- Clean the Surface: Before mounting, thoroughly clean the chosen area on your rear windshield with rubbing alcohol and a microfiber cloth. This ensures the adhesive mount sticks firmly.
- Insert SD Card: Always insert your dash cam’s SD card before starting the installation.
- Mount the Rear Camera: Carefully peel the adhesive backing and firmly press the rear camera onto the cleaned surface. Hold it in place for about 30-60 seconds to ensure a strong bond.
|
Our Picks for the Best Dash Cam in 2026
As an Amazon Associate I earn from qualifying purchases.
|
||
| Num | Product | Action |
|---|---|---|
| 1 | ROVE R2-4K DUAL Dash Cam Front and Rear, STARVIS 2 Sensor, FREE 128GB Card Included, 5G WiFi - up to 20MB/s Fastest Download Speed with App, 4K 2160P/FHD Dash Camera for Cars, 3" IPS, 24H Parking Mode |

|
| 2 | WOLFBOX G840S 12" 4K Mirror Dash Cam Backup Camera, 5.8GHz WiFi Smart Rearview Mirror for Cars & Trucks, Front and Rear View Dual Cameras, Night Vision, Parking Assistance, Included 32GB Card & GPS |
|
| 3 | Dual 4K Dash Cam Front and Rear - Free 64G SD Card, 2160P+2160P UHD Dash Camera for Cars, Dashcam with 176°+160° Wide Angle, 3.5'' IPS Screen Dashcam, G-Sensor, WDR, Night Vision, 24H Parking Monitor |
|
| 4 | VIOFO A229 Plus Dash Cam Front and Rear, Dual STARVIS 2 Sensors, 2 Channel HDR, 1440P+1440P Voice Control Car Dash Camera, 5GHz Wi-Fi, Voice Control, Ultra-Precise GPS |
|
| 5 | Garmin Dash Cam™ Mini 3, Ultracompact 1080p HD Dash Cam with a 140-degree Field of View, Built in Clarity™ Polarizer, Voice Controlled, Automatic Recording |
|
| 6 | 4K+4K Dash Cam Front and Rear, Free 128GB Card Included, 5.8GHz WiFi Dash Camera for Cars, Built-in GPS, G-Sensor, 170°Wide Angle, 3" IPS Screen, 24H Parking Mode, Support 512GB Max |
|
| 7 | REDTIGER 4K Dash Cam Front Rear, STARVIS 2 Sensor, Free Card Included, 5.8GHz WiFi-20MB/s Fast Download, Dash Camera for Cars with GPS, WDR Night Vision, 170°Wide Angle, 24H Parking Mode(F7NP) |
|
| 8 | Dash Cam Front and Rear, 2.5K Dual Dash Camera for Cars, 2560P Mini Car Camera, 2 inch IPS Screen, 32GB Card Included, WDR Night Vision, 24 Hours Parking Monitor, G-Sensor, Support 256 GB Max |
|
| 9 | 4K Dash Cam Front, Built-in 5G WiFi, 64GB Card Included, Dash Camera for Cars, Mini Dashcam with Super Night Vision, Loop Recording, G-Sensor, 24 Hours Parking Monitor, Support 256GB Max |
|
| 10 | Dash Cam Front and Rear, 1080P Dash Camera for Cars, 3 Channel Car Camera Front Rear and Inside with 32GB Card, Loop Recording, Night Vision, HDR, 24Hr Parking, G-Sensor |
|
2. Routing the Cable to the Hatch Door
Begin routing the rear camera’s cable from its mounting point towards the side of the rear windshield. Gently tuck the cable under the headliner, working your way towards the C-pillar (the rearmost pillar of the vehicle). Use plastic trim removal tools to carefully pry open and tuck the cable behind the interior trim panels. This creates a clean, hidden installation.
3. Conquering the Hatch Conduits: The Tricky Part
This is often the most challenging aspect of installing a rear camera in a hatchback or SUV due to the moving liftgate.
- Locate the Rubber Conduits: Open your vehicle’s liftgate and identify the flexible rubber grommets or hoses that connect the chassis (car body) to the liftgate. These conduits house existing wiring for your rear lights, defroster, and other components.
- Choose a Conduit: Squeeze each conduit to determine which one has the most “wiggle room” or empty space. This will be your best option for running the dash cam cable.
- Prepare Your Fish Wire: Straighten a coat hanger or use a long, rigid zip tie or electrical fish tape. This will act as your guide.
- Attach the Camera Cable: Using electrical tape, firmly attach the plug end of your rear camera cable to one end of your fish wire. Ensure the plug is completely covered with tape to protect its pins from damage and to create a smoother profile for pulling. Applying a small amount of cable lubricant or hand soap to the taped section can further assist in gliding the cable through.
- Fish the Cable Through: Carefully feed the fish wire (with the attached camera cable) into the chosen rubber conduit from either the liftgate side or the chassis side. Slowly and gently push and pull until the fish wire emerges from the other end. Once the fish wire is through, gently pull the camera cable through the conduit. This step may require patience and careful manipulation to avoid damaging the cable or the conduit.
- Re-secure and Hide: Once the cable is through, carefully remove the electrical tape and fish wire. You may need to temporarily remove some trim panels on the inside of the liftgate to properly hide the cable and prevent it from dangling or getting pinched.
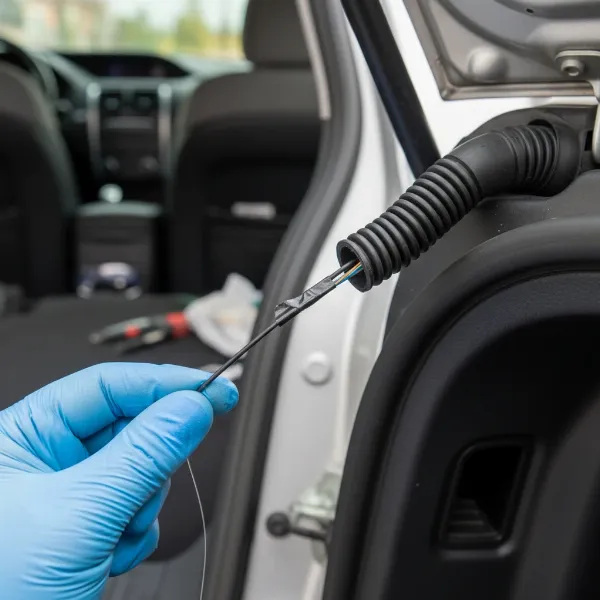 Hand using fish wire to route dash cam cable through a car's rubber liftgate conduit.
4. Routing Cable to the Front Dash Cam Unit
With the cable successfully routed into the vehicle’s main cabin, continue routing it towards the front dash cam unit.
- Along Pillars: Tuck the cable along the headliner and down the C-pillar. From there, continue along the roof edge to the B-pillar (between the front and rear doors) on the passenger side. Again, use trim removal tools to hide the cable behind the interior panels.
- Under Door Sills/Carpet: Once at the B-pillar, you can route the cable under the door sills or beneath the carpet towards the front of the vehicle. This keeps the cable completely hidden and prevents it from interfering with passenger space or vehicle operation.
- To the Front Unit: Finally, route the cable up the A-pillar (the pillar next to the windshield) and connect it to the rear camera input port on your front dash cam unit.
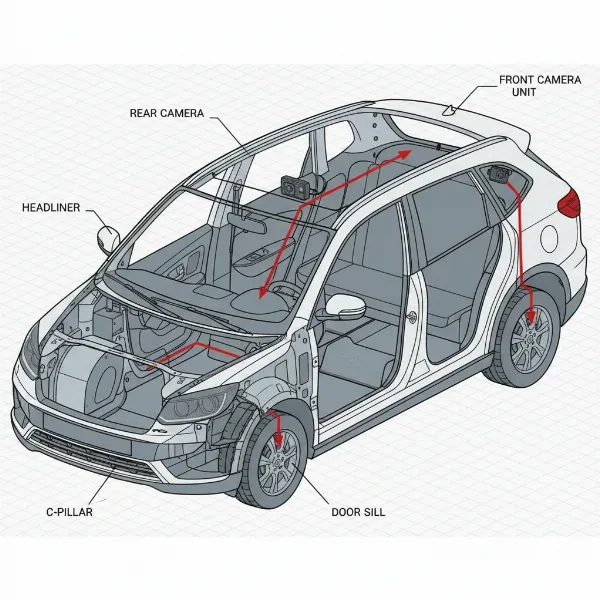 Diagram showing hidden cable routing for dash cam along car pillars and under trim.
5. Final Checks and Testing
- Connect Power: Ensure your front dash cam is properly powered.
- Test Recording: Start your vehicle and verify that both the front and rear dash cams power on and begin recording. Check the live view or recorded footage to confirm the rear camera’s angle is correct and unobstructed. Adjust the camera’s position slightly if needed.
- Secure All Wires: Once you’re satisfied with the camera’s operation, use cable clips or zip ties to secure any remaining loose wiring. Ensure no cables interfere with airbags, seat belts, or other moving parts.
Pro Tips for a Clean & Durable Install
- Use Plastic Pry Tools: Always use non-marring plastic trim removal tools to avoid scratching or damaging your vehicle’s interior panels.
- Heat Adhesive for Removal: If you ever need to remove the camera, apply some heat (e.g., with a hairdryer) to the adhesive to soften it, making removal easier and less likely to damage your defroster lines.
- Mount After Window Tinting: If you plan on tinting your windows, install the rear camera after the tint has been applied and cured. Otherwise, you may need to reinstall the camera with new adhesive.
- Airbag Safety: When routing cables near pillars, be mindful of side curtain airbags. Ensure cables are tucked behind existing factory wiring or secured in a way that does not impede airbag deployment.
- Consider Professional Help: If you encounter significant difficulties or are uncomfortable with any part of the wiring process, don’t hesitate to consult a professional installer. Their expertise can ensure a flawless and safe installation.
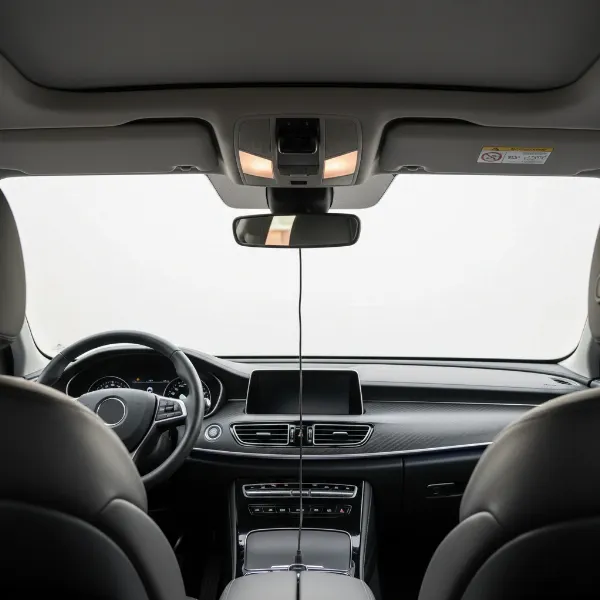 Clean, professionally installed dual-channel dash cam system in a car interior.
Conclusion
Installing a rear dash cam in your hatchback or SUV is a highly rewarding project that significantly boosts your vehicle’s security and your peace of mind. By carefully following these steps, particularly when navigating the unique challenges of the liftgate conduits, you can achieve a professional-grade installation that is both discreet and durable. Embrace the journey of enhancing your vehicle’s capabilities, knowing that you’re well-equipped for whatever the road brings. What other vehicle upgrades are on your DIY list?
Frequently Asked Questions
What is the best position for a rear dash cam on an SUV?
The optimal position for a rear dash cam on an SUV is typically the top center of the rear windshield. This location provides the widest possible field of view, minimizing blind spots and capturing comprehensive footage of the road behind you.
Can I install a rear dash cam myself?
Yes, installing a rear dash cam yourself is a common DIY project. While it requires patience and attention to detail, especially for cable routing through the liftgate, following a step-by-step guide and using the right tools makes it entirely feasible for most car owners.
How do I hide the wires for a rear dash cam in a hatchback?
To hide rear Dash Cam wires in a hatchback, route them along the headliner, tucking them behind interior trim panels, down the vehicle’s pillars, and under door sills or carpet. The most critical step is carefully feeding the cable through the flexible rubber conduits connecting the chassis to the liftgate.