Encountering stubborn sticky residue on your windshield after removing a dash cam, GPS mount, or other accessories can be incredibly frustrating. While 3M adhesive is renowned for its strong bond, designed for reliable long-term attachment, its removal often leaves behind a gummy, unsightly mess. This guide will walk you through safe and effective methods, both DIY and commercial, to meticulously clean your windshield without causing damage, restoring its clarity and your peace of mind.
Why 3M Adhesive is So Stubborn (and Why It Matters)
3M adhesives, particularly the VHB (Very High Bond) tapes, are engineered to create an incredibly strong, durable bond that resists extreme temperatures, moisture, and UV light. This strength is crucial for securely mounting items like dash cams, ensuring they stay put even on bumpy roads or in fluctuating climates. However, this very strength is what makes the residue so tenacious when it’s time for removal. Attempting to scrape it off dry or using inadequate cleaners can lead to frustrating smudges, scratches on the glass, or even a damaged windshield if not handled properly. Understanding the nature of this adhesive is the first step toward effective and safe removal.
Essential Tools and Safety Precautions
Before you begin, gathering the right tools and understanding proper safety measures will ensure a smooth, damage-free removal process. Patience and care are paramount when working on your vehicle’s glass.
Recommended Tools
To tackle 3M adhesive residue effectively, you’ll need a few common items:
- Microfiber cloths and paper towels: For applying solutions and wiping away residue.
- Cotton balls: Ideal for soaking and applying liquid solutions to small areas.
- Single-edge razor blade (new and sharp): Use with extreme caution and at a very shallow angle. A fresh blade is less likely to scratch than a dull one.
- Plastic scraper or old credit card: A safer alternative to a razor blade for initial scraping.
- Hairdryer or heat gun: To soften and loosen the adhesive.
- Dental floss or fishing line: Useful for separating thicker foam tape from the glass.
- Gloves and eye protection: Essential when working with chemical solvents to protect your skin and eyes.
- Glass cleaner: For the final cleaning stage.
|
Our Picks for the Best Dash Cam in 2026
As an Amazon Associate I earn from qualifying purchases.
|
||
| Num | Product | Action |
|---|---|---|
| 1 | Dash Cam Front and Rear, 2.5K Dual Dash Camera for Cars, 2560P Mini Car Camera, 2 inch IPS Screen, 32GB Card Included, WDR Night Vision, 24 Hours Parking Monitor, G-Sensor, Support 256 GB Max |

|
| 2 | VIOFO A229 Plus Dash Cam Front and Rear, Dual STARVIS 2 Sensors, 2 Channel HDR, 1440P+1440P Voice Control Car Dash Camera, 5GHz Wi-Fi, Voice Control, Ultra-Precise GPS |
|
| 3 | Garmin Dash Cam™ Mini 3, Ultracompact 1080p HD Dash Cam with a 140-degree Field of View, Built in Clarity™ Polarizer, Voice Controlled, Automatic Recording |
|
| 4 | Dash Cam Front and Rear, 1080P Dash Camera for Cars, 3 Channel Car Camera Front Rear and Inside with 32GB Card, Loop Recording, Night Vision, HDR, 24Hr Parking, G-Sensor |
|
| 5 | REDTIGER 4K Dash Cam Front Rear, STARVIS 2 Sensor, Free Card Included, 5.8GHz WiFi-20MB/s Fast Download, Dash Camera for Cars with GPS, WDR Night Vision, 170°Wide Angle, 24H Parking Mode(F7NP) |
|
| 6 | 4K Dash Cam Front, Built-in 5G WiFi, 64GB Card Included, Dash Camera for Cars, Mini Dashcam with Super Night Vision, Loop Recording, G-Sensor, 24 Hours Parking Monitor, Support 256GB Max |
|
| 7 | ROVE R2-4K DUAL Dash Cam Front and Rear, STARVIS 2 Sensor, FREE 128GB Card Included, 5G WiFi - up to 20MB/s Fastest Download Speed with App, 4K 2160P/FHD Dash Camera for Cars, 3" IPS, 24H Parking Mode |
|
| 8 | Dual 4K Dash Cam Front and Rear - Free 64G SD Card, 2160P+2160P UHD Dash Camera for Cars, Dashcam with 176°+160° Wide Angle, 3.5'' IPS Screen Dashcam, G-Sensor, WDR, Night Vision, 24H Parking Monitor |
|
| 9 | WOLFBOX G840S 12" 4K Mirror Dash Cam Backup Camera, 5.8GHz WiFi Smart Rearview Mirror for Cars & Trucks, Front and Rear View Dual Cameras, Night Vision, Parking Assistance, Included 32GB Card & GPS |
|
| 10 | 4K+4K Dash Cam Front and Rear, Free 128GB Card Included, 5.8GHz WiFi Dash Camera for Cars, Built-in GPS, G-Sensor, 170°Wide Angle, 3" IPS Screen, 24H Parking Mode, Support 512GB Max |
|
Safety First
Your windshield’s integrity is vital for safety, so always prioritize caution:
- Test in an inconspicuous area: If using a new chemical solution, apply a tiny amount to a hidden corner of the windshield to ensure it doesn’t cause any unexpected reactions or damage.
- Avoid aggressive scraping: Never apply excessive force with a razor blade. Scrape gently, moving in one direction, not back and forth, to prevent scratches.
- Ensure good ventilation: When using chemical solvents, work in a well-ventilated area, preferably outdoors, to avoid inhaling fumes.
- Gradual heat application: Do not apply intense heat to a cold windshield, as extreme temperature changes can stress the glass. Warm the area gradually.
Step-by-Step Guide: Physical Removal and Loosening
The most effective approach combines physical removal techniques with adhesive-dissolving solutions. Start by softening the adhesive.
Step 1: Apply Heat to Loosen the Bond
Heat is your ally when dealing with sticky adhesives. It softens the glue, making it more pliable and easier to remove.
- Using a Hairdryer or Heat Gun: Set your hairdryer to a medium-high setting or your heat gun to a low setting. Direct the hot air at the adhesive residue for about 30 to 60 seconds. You want the area to be warm to the touch, not scorching hot. This will help break down the adhesive’s bond with the glass.
- Leveraging Sun Exposure: On a hot, sunny day, parking your car with the adhesive spot directly facing the sun for an hour or two can naturally warm the windshield and soften the residue. This method provides an even heat distribution across the glass.
Step 2: Carefully Remove the Bulk of the Tape/Residue
Once the adhesive is warm and softened, you can begin the physical removal process.
- For Thicker Foam Tape: If you’re dealing with a thicker foam 3M tape, like those often used for Dash Cam mounts, dental floss or fishing line can be incredibly effective. Hold a length of floss taut between your hands and gently slide it behind the tape, using a sawing motion to separate the tape from the glass. This method prevents direct scraping on the windshield.
- For General Residue and Edges: For any remaining adhesive or to lift the edges of the softened tape, use a plastic scraper or an old credit card. Hold it at a very shallow angle (almost flat against the glass) and gently push the adhesive away. If using a single-edge razor blade, hold it at an even shallower angle – nearly flat – and carefully slide it under the residue. Always push away from yourself to minimize risk, and use light, consistent pressure. A gentle twisting motion can sometimes help dislodge the residue.
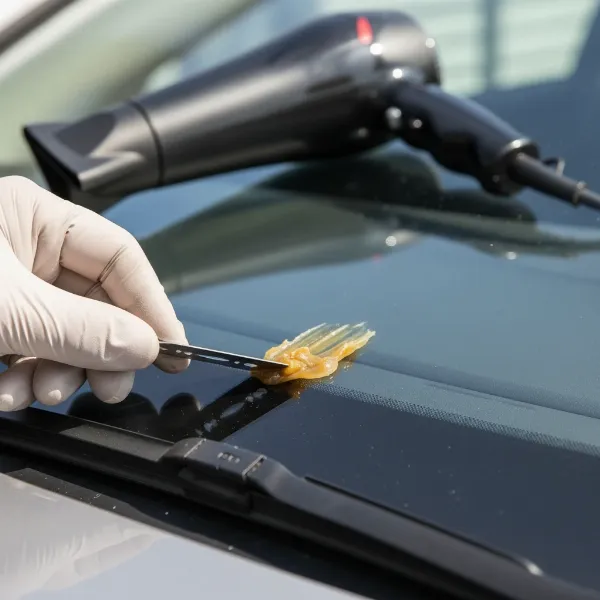 A person carefully scraping 3M adhesive residue from a car windshield with a razor blade after applying heat.
Effective Solutions for Dissolving 3M Adhesive Residue
After the bulk of the adhesive is removed, a sticky film often remains. This is where chemical solutions come into play, dissolving the remaining glue for a clean finish.
Common Household Items
Many effective solvents can be found right in your home, offering a cost-effective way to tackle adhesive residue.
- Rubbing Alcohol / Hand Sanitizer: Rubbing alcohol is an excellent solvent for breaking down adhesives and works well on smooth surfaces like glass. Hand sanitizer, with its high alcohol content, can serve as an effective substitute if rubbing alcohol isn’t readily available.
- How to Use: Pour a small amount of rubbing alcohol onto a cotton ball or a clean cloth. Press it onto the sticky residue and let it sit for a few minutes to allow the alcohol to penetrate the adhesive. Then, gently rub the area until the adhesive starts to dissolve and lift away. Wipe clean with a damp cloth afterward.
- White Vinegar: The acidity of white vinegar makes it a surprisingly effective solution for dissolving sticker residue, especially on glass and metal surfaces.
- How to Use: Soak a cloth or cotton ball in white vinegar. Apply it directly to the sticky area, ensuring the residue is saturated, and let it sit for 5-10 minutes. The vinegar’s acidity will help break down the adhesive. After soaking, rub the area with the cloth until the residue lifts off.
- Baking Soda Paste: When mixed with water, baking soda forms a mild abrasive paste that can gently scrub away stubborn adhesive without scratching glass.
- How to Use: Mix equal parts baking soda and water to form a paste. Apply the paste to the residue and gently rub with a cloth or sponge. Rinse or wipe clean with water.
- Peanut Butter: The oils found in peanut butter can surprisingly help dissolve sticker residue, making it a natural and chemical-free method. This works well on glass surfaces.
- How to Use: Spread a small amount of peanut butter over the sticky area. Let it sit for 5-10 minutes to allow the oils to penetrate and break down the adhesive. Wipe it off with a clean cloth, then clean the surface with soap and water to remove any oily residue.
Commercial Adhesive Removers
For particularly stubborn or extensive residue, commercial products formulated specifically for adhesive removal can save you time and effort.
- Goo Gone: This is one of the most popular and appropriately named commercial adhesive removers. It’s highly effective at breaking down sticky gunk on various surfaces, including glass, and is generally safe to use without causing damage.
- How to Use: Apply Goo Gone directly to the sticky residue. Allow it to sit for 5-10 minutes to penetrate the adhesive. Use a cloth or sponge to wipe off the residue, then clean the surface with soap and water to remove any oily residue.
- 3M Adhesive Remover: As the residue is from 3M products, using their dedicated adhesive remover can be particularly effective. It’s formulated to break down tough adhesives and is often safe for automotive finishes, making it ideal for windshields.
- How to Use: Spray the product onto the adhesive residue. Let it sit for a few minutes. Wipe away with a clean cloth or plastic scraper. Always wash the area with soap and water after removal.
- WD-40: Commonly known as a lubricant, WD-40 also possesses solvent properties that make it effective at dissolving adhesive residue from glass.
- How to Use: Spray WD-40 onto the adhesive residue. Let it sit for a few minutes to penetrate. Wipe off the residue with a clean cloth, and then clean the area thoroughly with soap and water.
- Acetone (Nail Polish Remover): Acetone is a powerful solvent that can dissolve glue effectively. However, it can be quite aggressive, and care should be taken to ensure it doesn’t contact painted surfaces or interior plastics, as it can cause damage.
- How to Use: Apply a small amount of acetone to a paper towel or cotton ball. Gently rub it on the adhesive residue. As it dissolves, wipe it away. Repeat as necessary, then clean the area with water and soap.
Final Cleaning and Finishing Touches
Once all the adhesive residue is gone, the final step is to clean your windshield thoroughly to remove any streaks or chemical traces.
- Spray a high-quality automotive glass cleaner onto the entire cleaned area.
- Wipe down the windshield with a clean, dry microfiber cloth, moving in overlapping sections to avoid streaks.
- Inspect the area carefully for any missed spots or lingering haze. If present, repeat the cleaning process with your chosen solvent or glass cleaner.
When to Call a Professional
While most 3M adhesive residue can be removed with DIY methods, there are instances when professional help might be warranted. If the residue is exceptionally large, old, or has been baked onto the glass for an extended period, making it extremely stubborn, a professional detailer may have stronger, safer solutions and tools. Additionally, if you are unsure about using razor blades or certain chemicals, or if you fear damaging your windshield, seeking expert assistance is always the safest option. Your windshield’s clarity is crucial for driving visibility and safety.
Conclusion
Removing 3M adhesive residue from your windshield doesn’t have to be a frustrating ordeal. By combining gentle heat application with careful physical removal and the right chemical solutions, you can effectively eliminate even the most stubborn sticky traces. Whether you opt for common household items like rubbing alcohol and vinegar or specialized commercial removers like Goo Gone or 3M Adhesive Remover, patience and a methodical approach are key to restoring your windshield to a pristine, streak-free condition. Keeping your windshield clear is not just about aesthetics; it’s a vital part of maintaining optimal visibility and safety on every journey.
What are your go-to methods for tackling tough adhesive residue on your car’s glass?
Frequently Asked Questions
Is it safe to use a razor blade on a windshield?
Yes, a new, sharp single-edge razor blade can be safely used on a car’s windshield, but extreme caution is advised. Hold the blade at a very shallow angle (almost flat against the glass) to avoid scratching. Always push in one direction, never saw back and forth, and ensure the glass is wet or lubricated with an adhesive remover to help the blade glide smoothly.
What is the best household item to remove 3M adhesive?
For general 3M adhesive residue, rubbing alcohol or white vinegar are highly effective household solutions. Rubbing alcohol acts as a solvent, breaking down the adhesive, while white vinegar’s acidity helps dissolve the sticky bond. Both are safe for glass and readily available.
How can I prevent sticky residue from 3M tape in the future?
While preventing residue entirely is difficult with strong adhesives, using specific automotive-grade double-sided tapes designed for easy removal or considering alternative mounting solutions that don’t rely on permanent adhesive can help. If using tape, remove it promptly if the accessory is no longer needed, as older adhesive is harder to remove.