In today’s fast-paced world, a dash cam is more than just a gadget; it’s your silent witness on the road, providing invaluable security and peace of mind. But for many, the thought of hardwiring a dash cam into their vehicle’s electrical system can be daunting. You envision complicated wiring, fuse box dilemmas, and potentially voiding a warranty. What if there was a simpler, cleaner, and equally effective way to power your dash cam, especially to capture crucial parking mode footage? Enter the OBD-II power cable—a modern solution designed for ease and efficiency, transforming a once complex task into a simple plug-and-play operation. This guide will walk you through everything you need to know about using an OBD-II power cable for a seamless dash cam installation.
What is an OBD-II Port and Why Use It for a Dash Cam?
The On-Board Diagnostics II (OBD-II) port is a standardized connector found in most vehicles manufactured after 1996. Primarily designed for mechanics to access your vehicle’s computer system for diagnostics and emissions data, this unassuming port also provides a convenient source of constant 12V power. Utilizing an OBD-II power cable for your dash cam offers a compelling alternative to traditional hardwiring, bringing a host of benefits that make installation simpler and more flexible.
The main advantage lies in its simplicity. Instead of locating specific fuse slots, crimping wires, or removing vehicle panels, an OBD-II power cable plugs directly into the port, providing instant power. This makes it an ideal solution for DIY enthusiasts, individuals with leased vehicles who want to avoid permanent modifications, or anyone who prefers a non-invasive setup. Furthermore, these cables are often designed with intelligent features, such as built-in low-voltage cut-off protection, which monitors your car battery’s voltage and automatically cuts power to the dash cam if it drops below a user-defined threshold. This crucial safeguard prevents your vehicle’s battery from draining completely, ensuring you can always start your car.
For those who prioritize continuous surveillance, an OBD-II cable can be a game-changer. Many models support parking mode functionality, allowing your dash cam to remain powered and record incidents even when your vehicle is turned off. This feature is essential for capturing hit-and-runs, vandalism, or other events that occur while your car is parked. The convenience doesn’t stop there; an OBD-II setup is highly portable. If you switch vehicles, you can easily unplug your dash cam and its power cable and transfer them to your new ride, making it a truly versatile powering option. This method is particularly beneficial for electric vehicles, which may lack traditional fuse panels, simplifying dash cam installation where hardwiring might be impossible.
OBD-II Power Cable vs. Traditional Hardwiring: A Comparison
When it comes to powering a dash cam for parking mode, two primary methods stand out: traditional hardwiring to the fuse box and utilizing an OBD-II power cable. While both achieve the goal of continuous power, they differ significantly in complexity, installation time, and user experience. Understanding these differences can help you decide which method is best for your needs.
Traditional hardwiring involves connecting a specialized kit directly to your vehicle’s fuse box. This typically requires identifying both a constant power fuse (always on) and an accessory power fuse (on with ignition), along with a ground point. While effective, hardwiring can be a meticulous process, demanding a basic understanding of automotive electrical systems. You might need to test fuses, interpret wiring diagrams, and carefully route cables through your vehicle’s interior panels. For many, the thought of tampering with the car’s electrical system can be daunting and time-consuming.
In contrast, the OBD-II power cable offers a “plug-and-play” solution that bypasses the complexities of the fuse box entirely. The installation typically involves simply plugging the cable into the easily accessible OBD-II port, which is generally located under the driver’s dashboard. This eliminates the need for any cutting, splicing, or fuse tapping, making it significantly faster and less intrusive. Modern OBD-II cables are designed to replicate the functionality of a 3-wire hardwire kit, providing both continuous and switched power signals to your dash cam, which is crucial for advanced parking modes. Some even feature manual switches to select between standard (ignition-only) and parking (continuous) modes, offering greater control.
> “The greatest advantage of the OBD-II power cable is undoubtedly its ease of installation. It demystifies the process of powering a dash cam, opening up advanced features like parking mode to a broader audience without the need for intricate electrical knowledge.” – Admin, Dashcamon.com, Dash Cam Expert
While some older discussions raised concerns about the OBD-II port being unsuitable for long-term power or potentially interfering with vehicle diagnostics, modern OBD-II power cables are engineered with vehicle safety in mind. The OBD-II port’s Pin 16 is designed to deliver constant 12V power and can safely supply the low amperage required by most dash cams (typically up to 4.0A). Quality OBD-II cables often include integrated circuit protection and adjustable low-voltage cut-off settings, ensuring your vehicle’s electrical system remains undisturbed and its battery protected. This makes the OBD-II cable a robust and user-friendly alternative to hardwiring, especially for those seeking a quick, clean, and easily reversible installation.
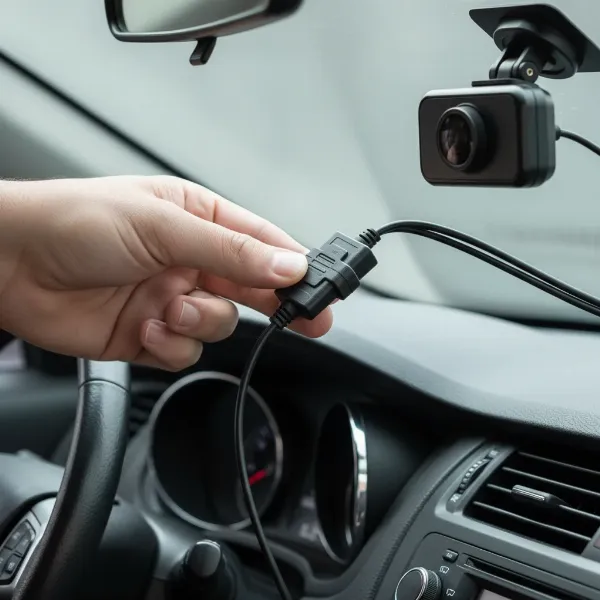 An OBD-II power cable plugged into a car's OBD-II port, with a dash cam connected.
Step-by-Step Guide: Installing Your Dash Cam with an OBD-II Power Cable
Installing your dash cam using an OBD-II power cable is refreshingly straightforward, even for those new to car electronics. Follow these simple steps for a clean, secure, and hassle-free setup that will have your dash cam operational in minutes.
1. Locate Your Vehicle’s OBD-II Port: The first and most crucial step is finding your car’s OBD-II port. This standardized 16-pin connector is almost universally located on the driver’s side, typically underneath the dashboard or near the steering wheel column. It might be exposed or hidden behind a small cover or panel that you can easily unclip. If you’re struggling to locate it, a quick check of your vehicle’s owner’s manual will pinpoint its exact position.
2. Plug In the OBD-II Power Cable: Once you’ve found the port, simply align the OBD-II end of your power cable with the vehicle’s port and push firmly until it clicks securely into place. The connection is universal, so it should fit without any forcing. Many OBD-II cables feature an indicator light that illuminates once a connection is established, confirming that power is flowing.
3. Connect to Your Dash Cam: The other end of the OBD-II power cable will typically have a USB connector (Mini-USB, Micro-USB, or USB-C), which plugs directly into your dash cam. Ensure your dash cam is compatible with the cable’s connector type. Once connected, your dash cam should power on, often indicated by an LED light or a startup chime.
4. Test and Configure Your Dash Cam: With the dash cam connected and powered, turn your vehicle’s ignition on and ensure the dash cam operates correctly. Check if it starts recording automatically and if all its functions, such as video quality settings and parking mode features, are accessible. If your OBD-II cable has a switch for “Standard” (S) or “Parking” (P) mode, set it to “P” if you desire continuous recording after the engine is off. Additionally, many OBD-II power kits allow you to set a specific low-voltage cut-off threshold. This feature is vital for protecting your car’s battery; adjust it according to your dash cam’s requirements and your vehicle’s battery health. Higher voltage cut-offs offer greater battery protection, while lower settings allow for longer parking mode recordings.
5. Route and Hide the Cables for a Clean Look: To achieve a professional and tidy installation, neatly route the power cable along the edges of your dashboard, up the A-pillar (the frame between your windshield and side window), and across the headliner to your dash cam. Use a plastic pry tool (often included with dash cam kits) to tuck the cable discreetly behind trim panels and rubber seals. When routing, always be mindful of airbags; avoid running cables in any areas that could obstruct their deployment in an accident. A well-hidden cable not only looks better but also prevents clutter and potential interference with your driving.
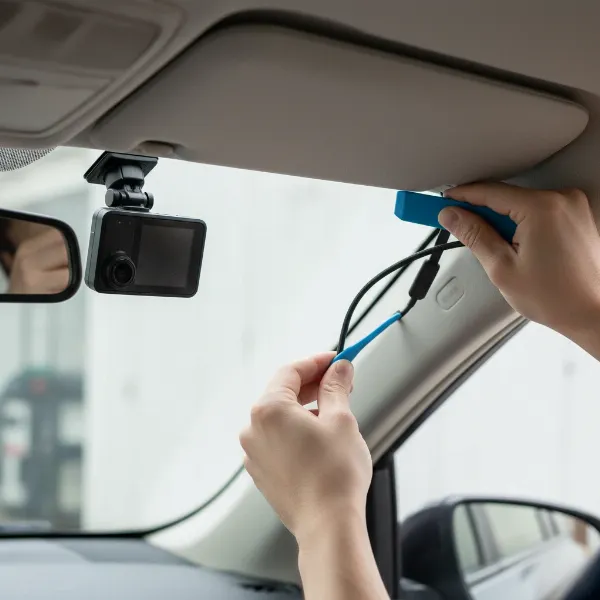 A person carefully tucking a dash cam power cable along the car's A-pillar.
Choosing the Right OBD-II Power Cable for Your Dash Cam
Selecting the ideal OBD-II power cable is crucial for ensuring seamless integration and reliable performance of your dash cam. With several options available, knowing what to look for can help you make an informed decision.
First, compatibility is paramount. While the OBD-II port is universal, the connector that plugs into your dash cam is not. Most dash cams use either a Mini-USB, Micro-USB, or USB-C connector. Double-check your dash cam’s input port type before purchasing an OBD-II cable to ensure a perfect match. Some premium dash cam brands, like BlackVue or IROAD, also offer proprietary OBD-II cables specifically designed for their models, which often integrate more tightly with the dash cam’s software for advanced parking mode controls.
A critical feature to look for is low-voltage cut-off protection. This safeguard is essential for preventing your car battery from draining when the dash cam operates in parking mode. Most quality OBD-II power cables come with adjustable voltage cut-off settings (e.g., 12.4V, 12.0V, 11.6V). Setting a higher cut-off voltage offers more protection for your battery, while a lower setting allows for extended parking mode recording. Some cables also include a timer function that will shut off power after a set duration (e.g., 6, 12, 24 hours), providing an additional layer of battery protection.
Consider the parking mode options offered by the cable. Many modern OBD-II cables feature a physical switch to toggle between “Standard” (ACC) mode, where the dash cam powers off with the ignition, and “Parking” mode, which provides continuous power for motion or impact detection. For example, the IROAD OBD-II IM-300 cable often includes such a switch, enabling flexible power management. If you plan to use parking mode extensively, ensure the cable explicitly supports it and offers flexible configuration options.
Finally, think about cable length and additional features. A longer cable (typically 3-4 meters) provides ample slack for routing the wires discreetly around your windshield and A-pillar, ensuring a clean installation. Some OBD-II power cables may also offer dual USB outputs, allowing you to power a second dash cam (such as a rear camera) or another USB device, maximizing convenience. Always opt for a reputable brand to ensure durability, electrical safety, and consistent power delivery.
Tips for Optimal Performance and Longevity
Maximizing the lifespan and effectiveness of your dash cam and its OBD-II power cable involves a few simple best practices. By following these tips, you can ensure your setup consistently performs as expected and continues to provide reliable security on and off the road.
Firstly, regularly check your vehicle’s battery voltage, especially if you frequently use parking mode. While OBD-II cables offer low-voltage cut-off protection, monitoring your battery’s overall health can help prevent unexpected power issues. If you notice your dash cam cutting off earlier than expected, it might be an indicator of a weakening car battery. Modern cars often display battery voltage, or you can use a simple multimeter.
Proper cable routing isn’t just for aesthetics; it’s crucial for longevity and safety. Ensure all cables are securely tucked away, especially in areas where they might be exposed to friction or snagging. Loose cables can not only be distracting but also get damaged over time, leading to intermittent power supply. Always confirm that no cables interfere with critical vehicle operations like pedal movement or airbag deployment.
Periodically inspect the OBD-II port connection and the dash cam’s power input. Vibrations from driving can sometimes loosen connections, leading to power interruptions. A quick visual check and a gentle push to ensure everything is firmly seated can prevent many common power-related issues. Additionally, keep the OBD-II port free from dust and debris, as this can affect connectivity.
Finally, follow your dash cam’s maintenance guidelines. This includes regularly formatting the memory card to prevent corruption and updating firmware to ensure optimal performance and compatibility with your power accessories. A well-maintained dash cam, powered by a reliable OBD-II cable, will offer consistent protection and peace of mind for years to come.
Conclusion
Embracing an OBD-II power cable for your dash cam installation offers a clear path to convenience, efficiency, and enhanced vehicle security. Gone are the days of complex hardwiring dilemmas; with a simple plug-and-play solution, you can now effortlessly power your dash cam, enabling critical features like parking mode without fear of battery drain. This modern approach provides a clean setup, easy portability, and robust battery protection, making advanced dash cam functionality accessible to everyone. So why not empower your dash cam with the simplicity it deserves? Upgrade to an OBD-II power cable and enjoy uninterrupted peace of mind on every journey. What’s holding you back from experiencing truly effortless dash cam security?
Frequently Asked Questions
Is it safe to power a dash cam from the OBD-II port long-term?
|
Our Picks for the Best Dash Cam in 2026
As an Amazon Associate I earn from qualifying purchases.
|
||
| Num | Product | Action |
|---|---|---|
| 1 | Dual 4K Dash Cam Front and Rear - Free 64G SD Card, 2160P+2160P UHD Dash Camera for Cars, Dashcam with 176°+160° Wide Angle, 3.5'' IPS Screen Dashcam, G-Sensor, WDR, Night Vision, 24H Parking Monitor |

|
| 2 | WOLFBOX G840S 12" 4K Mirror Dash Cam Backup Camera, 5.8GHz WiFi Smart Rearview Mirror for Cars & Trucks, Front and Rear View Dual Cameras, Night Vision, Parking Assistance, Included 32GB Card & GPS |
|
| 3 | 4K+4K Dash Cam Front and Rear, Free 128GB Card Included, 5.8GHz WiFi Dash Camera for Cars, Built-in GPS, G-Sensor, 170°Wide Angle, 3" IPS Screen, 24H Parking Mode, Support 512GB Max |
|
| 4 | 4K Dash Cam Front, Built-in 5G WiFi, 64GB Card Included, Dash Camera for Cars, Mini Dashcam with Super Night Vision, Loop Recording, G-Sensor, 24 Hours Parking Monitor, Support 256GB Max |
|
| 5 | Garmin Dash Cam™ Mini 3, Ultracompact 1080p HD Dash Cam with a 140-degree Field of View, Built in Clarity™ Polarizer, Voice Controlled, Automatic Recording |
|
| 6 | ROVE R2-4K DUAL Dash Cam Front and Rear, STARVIS 2 Sensor, FREE 128GB Card Included, 5G WiFi - up to 20MB/s Fastest Download Speed with App, 4K 2160P/FHD Dash Camera for Cars, 3" IPS, 24H Parking Mode |
|
| 7 | REDTIGER 4K Dash Cam Front Rear, STARVIS 2 Sensor, Free Card Included, 5.8GHz WiFi-20MB/s Fast Download, Dash Camera for Cars with GPS, WDR Night Vision, 170°Wide Angle, 24H Parking Mode(F7NP) |
|
| 8 | VIOFO A229 Plus Dash Cam Front and Rear, Dual STARVIS 2 Sensors, 2 Channel HDR, 1440P+1440P Voice Control Car Dash Camera, 5GHz Wi-Fi, Voice Control, Ultra-Precise GPS |
|
| 9 | Dash Cam Front and Rear, 1080P Dash Camera for Cars, 3 Channel Car Camera Front Rear and Inside with 32GB Card, Loop Recording, Night Vision, HDR, 24Hr Parking, G-Sensor |
|
| 10 | Dash Cam Front and Rear, 2.5K Dual Dash Camera for Cars, 2560P Mini Car Camera, 2 inch IPS Screen, 32GB Card Included, WDR Night Vision, 24 Hours Parking Monitor, G-Sensor, Support 256 GB Max |
|
Yes, it is generally safe to power a dash cam from the OBD-II port long-term. Modern OBD-II power cables are designed specifically for this purpose and include built-in safety features like low-voltage cut-off protection to prevent battery drain. The OBD-II port itself is engineered to safely provide constant 12V power.
Does an OBD-II cable enable parking mode for my dash cam?
Most quality OBD-II power cables are designed to enable parking mode. They provide continuous power to your dash cam even when the ignition is off, allowing features like motion detection or impact recording to function. Many cables also include switches to select between standard and parking modes.
Will an OBD-II cable drain my car battery?
Reputable OBD-II power cables include an adjustable low-voltage cut-off feature. This mechanism automatically stops supplying power to the dash cam if your car’s battery voltage drops below a preset level, effectively preventing the battery from draining to a point where you cannot start your vehicle.
Can I use an OBD-II cable with any dash cam?
While the OBD-II port connection is universal, the connector that plugs into your dash cam (e.g., Mini-USB, Micro-USB, USB-C) must match. Always verify the input port type of your Dash Cam before purchasing an OBD-II power cable to ensure compatibility.
Where is my vehicle’s OBD-II port located?
The OBD-II port is typically located on the driver’s side of the vehicle, usually underneath the dashboard, near the steering wheel column. It may be exposed or hidden behind a small removable panel. If you cannot find it, consult your vehicle’s owner’s manual for its exact location.