Ever wished your dash cam worked its magic even when your car is off, standing guard against unexpected bumps or unfortunate incidents? While a dash cam plugged into your cigarette lighter offers basic recording, hardwiring it directly to your vehicle’s fuse box unlocks a world of enhanced protection, including crucial parking mode functionality and a seamlessly integrated, wire-free aesthetic. This guide will walk you through a detailed, step-by-step process, transforming your dash cam from a simple recording device into a vigilant 24/7 security system for your vehicle.
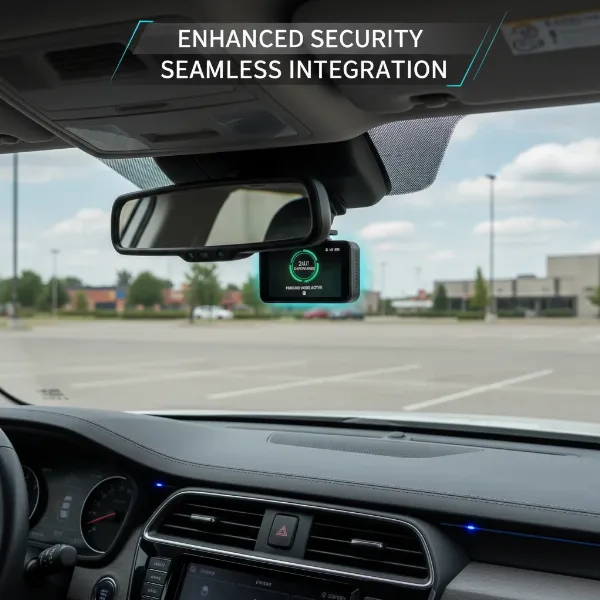 Dash cam hardwired for 24/7 surveillance and clean installation
Why Hardwire Your Dash Cam? Unlocking Advanced Protection
Hardwiring your dash cam offers significant advantages over simply using the cigarette lighter port, elevating your vehicle’s security and convenience.
- 24/7 Surveillance (Parking Mode): This is arguably the biggest benefit. Hardwiring provides continuous power, enabling your dash cam’s parking mode. This feature allows the camera to record crucial events like hit-and-runs, vandalism, or theft even when your car is parked and the ignition is off, offering invaluable evidence should anything happen.
- Clean Installation: Say goodbye to dangling cables and occupied cigarette lighter sockets. Hardwiring neatly tucks all wires behind your vehicle’s interior panels, maintaining a clean and factory-fitted look while freeing up your power outlets for other devices.
- Automatic Operation: Once hardwired, your dash cam powers on and off automatically with your vehicle’s ignition. There’s no need for manual intervention, ensuring you never miss a recording because you forgot to plug it in.
- Stable Power Supply: Direct connection to the fuse box provides a consistent and stable power source. This prevents power fluctuations that can occur with cigarette lighter adapters, which might otherwise affect recording quality or potentially damage your dash cam over time.
While using a cigarette lighter plug is simpler, it often means your dash cam only records when the engine is running, leaving your vehicle vulnerable when parked. Hardwiring is the upgrade that delivers true peace of mind.
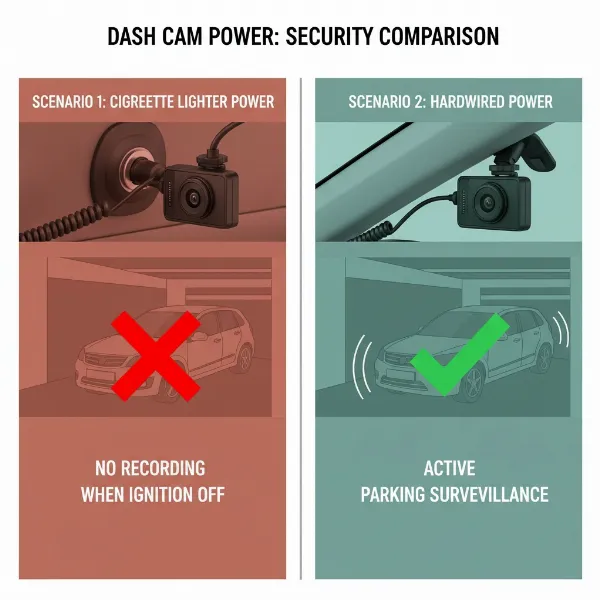 Comparison of dash cam power sources: cigarette lighter vs. hardwired for parking mode
Essential Tools and Materials for Hardwiring
Before you begin, gather the following tools and components to ensure a smooth and safe installation process:
- Dash Cam Hardwire Kit: This specialized kit is crucial. It typically includes:
- Fuse Taps (Add-a-Circuit): These allow you to safely “piggyback” onto an existing fuse slot to draw power for your dash cam without cutting wires. You’ll need different sizes (Mini, Micro2, ATO/ATC) to match your vehicle’s fuses.
- Power Wires: Usually one red wire for constant power (always hot) and one yellow (or white) wire for ACC power (accessory/switched).
- Ground Wire: A black wire with a ring terminal to connect to a metal ground point on your car’s chassis.
- Multimeter or Circuit Tester: Absolutely essential for accurately identifying constant and ACC power fuse slots. Do not guess; testing ensures correct wiring.
- Fuse Puller: Often included with fuse taps or your vehicle’s fuse box, this tool safely removes fuses. Needle-nose pliers can also work in a pinch.
- Wire Strippers/Crimpers: To prepare wire ends and securely crimp connections to the fuse taps.
- Zip Ties or Electrical Tape: For neatly bundling and securing excess cable, preventing rattles and ensuring a tidy installation.
- Trim Removal Tool (Optional but Recommended): A set of plastic pry tools helps safely remove and tuck wires behind interior trim panels without causing damage.
- Vehicle Owner’s Manual: Indispensable for locating fuse boxes, understanding your fuse diagram, and identifying non-essential circuits.
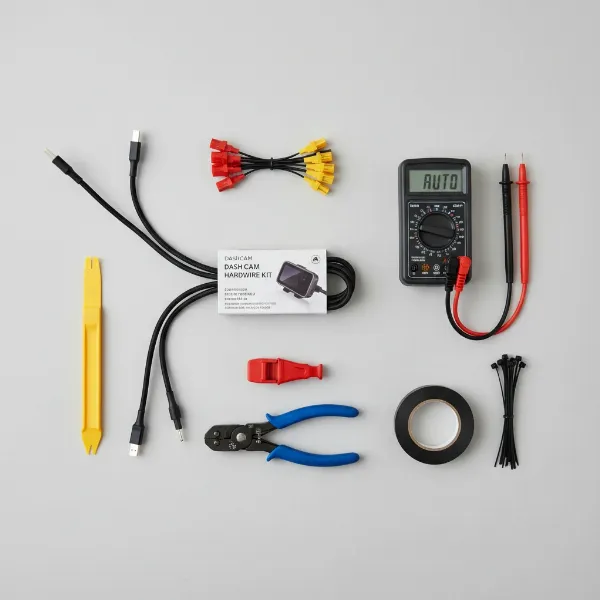 Essential tools and components for hardwiring a dash cam safely
Understanding Your Vehicle’s Fuse Box
Your car’s electrical system is protected by a network of fuses housed in one or more fuse boxes. Understanding their location and function is key to a successful hardwire installation.
- Locating the Fuse Box: Most vehicles have at least one interior fuse box, commonly found:
- Under the dashboard (driver’s or passenger’s side).
- In the glove compartment.
- Behind a small removable panel in the footwell.
- Some vehicles also have a fuse box under the hood in the engine compartment. For dash cam hardwiring, you’ll typically use an interior fuse box. Always consult your vehicle’s owner’s manual for the exact location and a detailed fuse diagram.
- Fuse Types: Vehicles use various fuse types, including ATC (blade), ATS (mini blade), MICRO2, and MINI. Your hardwire kit should come with fuse taps compatible with your car’s specific fuse type. Open your fuse box and visually check before purchasing your kit.
- Identifying Power Sources: The hardwire kit requires two distinct power sources and a ground connection:
- Constant Power (Always Hot): This circuit remains live even when your ignition is off. It’s crucial for enabling parking mode, allowing your dash cam to monitor your vehicle 24/7. Good candidates often include fuses for hazard lights, interior lighting, or the radio memory.
- ACC Power (Accessory/Switched): This circuit is only active when your vehicle’s ignition is on (or in the accessory position). It tells your dash cam when the car is running and when to switch from continuous recording to parking mode. Fuses for the radio, windshield wipers, or power windows are often suitable.
- Ground: This is the return path for the electrical current. The black ground wire from your hardwire kit connects to a bare metal bolt or screw on your vehicle’s chassis, providing a safe and secure connection.
- Safety Precautions: When choosing fuse slots, never tap into critical safety circuits such as those for airbags, anti-lock brakes (ABS), engine control unit (ECU), or power steering. These are vital for your vehicle’s operation and safety. Additionally, aim for fuses with a current rating between 7.5A and 15A. Your hardwire kit includes its own small fuse (typically 2A or 3A) to protect the dash cam itself.
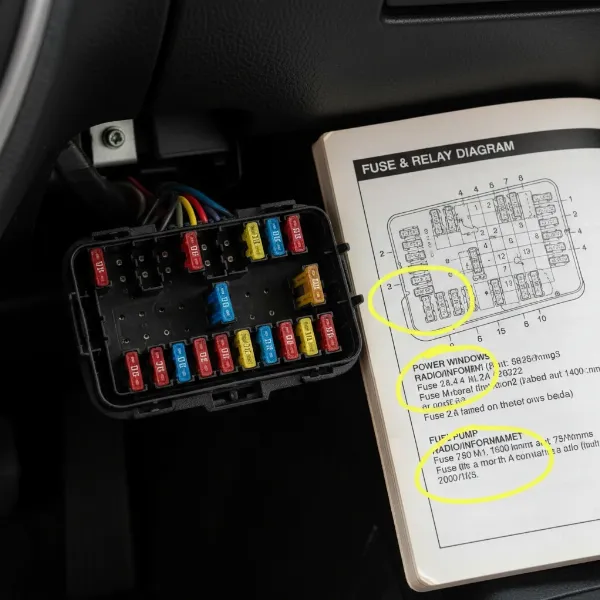 Vehicle fuse box location, diagram, and various fuse types
Step-by-Step Hardwiring Installation Guide
Follow these steps carefully for a secure and functional dash cam hardwire installation.
Step 1: Prepare Your Vehicle and Workspace
|
Our Picks for the Best Dash Cam in 2026
As an Amazon Associate I earn from qualifying purchases.
|
||
| Num | Product | Action |
|---|---|---|
| 1 | REDTIGER 4K Dash Cam Front Rear, STARVIS 2 Sensor, Free Card Included, 5.8GHz WiFi-20MB/s Fast Download, Dash Camera for Cars with GPS, WDR Night Vision, 170°Wide Angle, 24H Parking Mode(F7NP) |

|
| 2 | WOLFBOX G840S 12" 4K Mirror Dash Cam Backup Camera, 5.8GHz WiFi Smart Rearview Mirror for Cars & Trucks, Front and Rear View Dual Cameras, Night Vision, Parking Assistance, Included 32GB Card & GPS |
|
| 3 | VIOFO A229 Plus Dash Cam Front and Rear, Dual STARVIS 2 Sensors, 2 Channel HDR, 1440P+1440P Voice Control Car Dash Camera, 5GHz Wi-Fi, Voice Control, Ultra-Precise GPS |
|
| 4 | Dash Cam Front and Rear, 2.5K Dual Dash Camera for Cars, 2560P Mini Car Camera, 2 inch IPS Screen, 32GB Card Included, WDR Night Vision, 24 Hours Parking Monitor, G-Sensor, Support 256 GB Max |
|
| 5 | ROVE R2-4K DUAL Dash Cam Front and Rear, STARVIS 2 Sensor, FREE 128GB Card Included, 5G WiFi - up to 20MB/s Fastest Download Speed with App, 4K 2160P/FHD Dash Camera for Cars, 3" IPS, 24H Parking Mode |
|
| 6 | Dual 4K Dash Cam Front and Rear - Free 64G SD Card, 2160P+2160P UHD Dash Camera for Cars, Dashcam with 176°+160° Wide Angle, 3.5'' IPS Screen Dashcam, G-Sensor, WDR, Night Vision, 24H Parking Monitor |
|
| 7 | 4K Dash Cam Front, Built-in 5G WiFi, 64GB Card Included, Dash Camera for Cars, Mini Dashcam with Super Night Vision, Loop Recording, G-Sensor, 24 Hours Parking Monitor, Support 256GB Max |
|
| 8 | 4K+4K Dash Cam Front and Rear, Free 128GB Card Included, 5.8GHz WiFi Dash Camera for Cars, Built-in GPS, G-Sensor, 170°Wide Angle, 3" IPS Screen, 24H Parking Mode, Support 512GB Max |
|
| 9 | Garmin Dash Cam™ Mini 3, Ultracompact 1080p HD Dash Cam with a 140-degree Field of View, Built in Clarity™ Polarizer, Voice Controlled, Automatic Recording |
|
| 10 | Dash Cam Front and Rear, 1080P Dash Camera for Cars, 3 Channel Car Camera Front Rear and Inside with 32GB Card, Loop Recording, Night Vision, HDR, 24Hr Parking, G-Sensor |
|
Safety first! Turn off your vehicle’s engine and remove the key from the ignition. Open all doors to help dissipate any residual electrical charge and disconnect the negative terminal of your car battery for maximum safety during wiring. Gather all your tools and the dash cam hardwire kit, ensuring everything is within reach.
Step 2: Locate the Fuse Box and Identify Power Sources
Refer to your vehicle’s owner’s manual to pinpoint the exact location of the interior fuse box and its corresponding fuse diagram. This diagram is essential for understanding each fuse’s function.
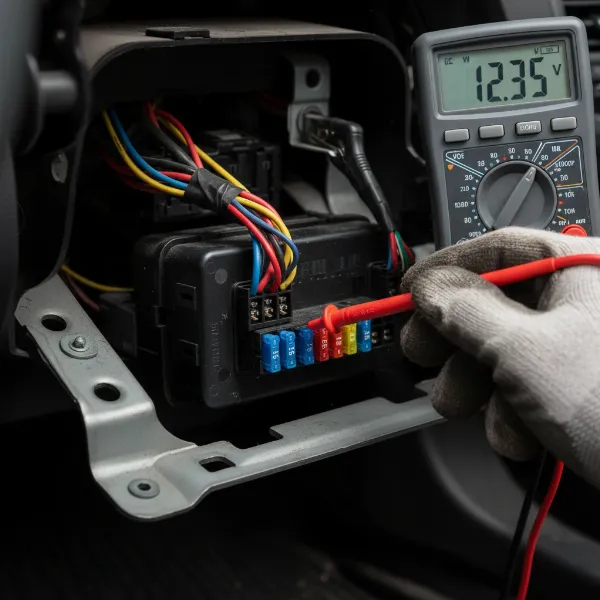
Next, using your multimeter or circuit tester, you’ll identify suitable fuse slots for constant and ACC power:
- To find Constant Power: With the ignition off and key removed, probe the metal contacts of various fuses. A fuse that causes your circuit tester light to illuminate (or shows approximately 12V on a multimeter) is a constant power source.
- To find ACC Power: With the ignition off, probe fuses. Then, turn the ignition to the “ACC” or “ON” position and re-test. A fuse that lights up only when the ignition is on (or shows 12V with ignition on and 0V with ignition off) is an ACC power source.
Select non-essential circuits (e.g., radio, cigarette lighter, power windows for ACC; interior lights, horn for constant) that have a fuse rating between 7.5A and 15A.
 Using a multimeter to identify constant and ACC power in a fuse box
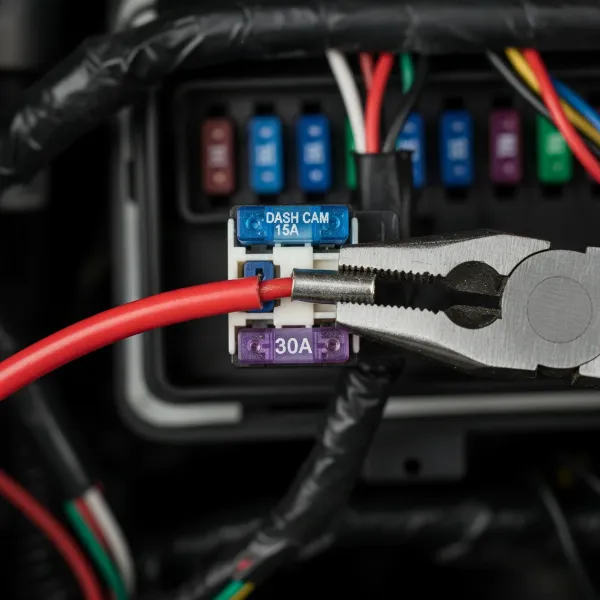
Step 3: Connect the Fuse Taps
Once you’ve identified your desired fuse slots, you’ll prepare the fuse taps. Each fuse tap has two slots:
- Insert the original fuse (the one you removed from your car’s fuse box) into the lower slot of the fuse tap. This maintains the original circuit’s protection.
- Insert the new, smaller fuse (typically 2A or 3A, provided with your hardwire kit) into the upper slot of the fuse tap. This fuse protects your dash cam.
Now, crimp the appropriate wires from your hardwire kit to the fuse taps:
- Connect the red (constant power) wire to the fuse tap for your chosen constant power slot.
- Connect the yellow (ACC power) wire to the fuse tap for your chosen ACC power slot.
Ensure the connections are secure by giving them a gentle tug.
 Assembling fuse taps with original and new fuses and crimping wires
Step 4: Install the Fuse Taps into the Fuse Box
Carefully plug the assembled fuse taps back into the respective fuse slots you identified in Step 2. Make sure they are firmly seated.
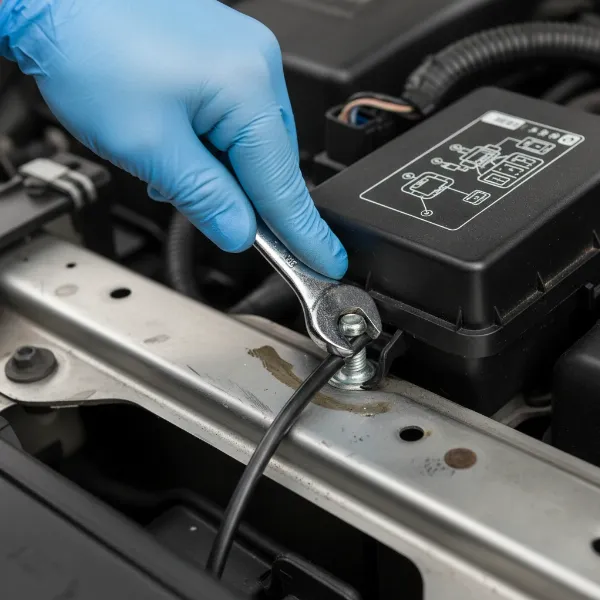
Step 5: Secure the Ground Wire
Locate a suitable metal bolt or screw near the fuse box that is part of the vehicle’s chassis (an unpainted metal surface is ideal). Loosen the bolt or screw, slide the ring terminal of the black ground wire under it, and then tighten the bolt securely. This creates a solid electrical ground connection.
 Connecting the dash cam hardwire kit's ground wire to vehicle chassis
Step 6: Route and Conceal the Dash Cam Cable
Begin routing the main power cable from your dash cam itself. Neatly tuck the cable along the edge of your headliner, then down the A-pillar (the pillar between your windshield and front door), and finally towards the fuse box area.
- Use a plastic trim removal tool to gently pry open panels and tuck the cable cleanly behind them.
- Ensure the cable does not obstruct airbags, interfere with any moving parts (like pedals or steering), or get pinched by door frames.
- Use zip ties or electrical tape at regular intervals (every 12 inches is a good guide) to secure any loose cable inside the panels, preventing rattles and ensuring a professional finish.
 Neatly routing and concealing the dash cam power cable along the A-pillar
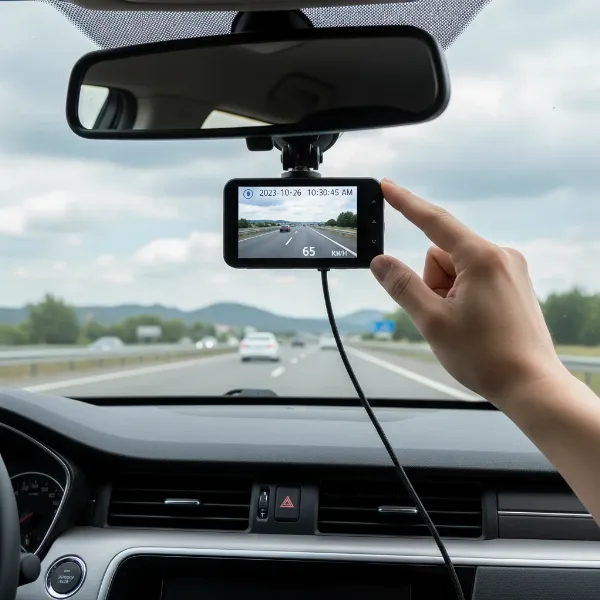
Step 7: Connect to the Dash Cam and Test
Finally, plug the hardwire kit’s power connector into your dash cam. Reconnect your car’s negative battery terminal.
- Start your vehicle’s engine. Your dash cam should power on automatically.
- Check the dash cam’s display or companion app to confirm it’s recording and that all functions are working.
- Turn off your vehicle’s ignition and remove the key. If your dash cam has parking mode, observe whether it transitions into this mode after a few seconds.
Adjust the dash cam’s angle for optimal viewing. If everything functions correctly, you can now fully reassemble any removed trim panels and enjoy your newly hardwired dash cam.
 Testing a newly hardwired dash cam after installation in a car
Common Hardwiring Challenges and Troubleshooting
Even with careful planning, you might encounter minor issues. Here’s how to address them:
- Dash Cam Not Powering On:
- Check Fuses: Ensure both the original vehicle fuse and the new dash cam fuse in each fuse tap are intact and properly seated.
- Ground Connection: Verify the black ground wire has a solid connection to bare metal.
- Fuse Slots: Double-check that your constant and ACC fuse taps are in the correct slots (test again with a multimeter).
- Kit Connection: Ensure the hardwire kit is securely plugged into your dash cam.
- Parking Mode Not Working:
- Constant Power: The most common reason is an issue with the constant power connection. Re-test the constant power fuse slot with the ignition off.
- Dash Cam Settings: Confirm parking mode is enabled in your dash cam’s menu settings.
- Low Voltage Cutoff: Some hardwire kits have adjustable low voltage cutoffs. Ensure it’s set appropriately for your battery type.
- Draining Car Battery:
- A properly installed hardwire kit includes a low voltage cutoff (LVC). This feature monitors your car battery’s voltage and cuts power to the dash cam if it drops below a safe threshold, preventing your battery from dying. Ensure your kit has this feature and that it’s functioning correctly. If you regularly use parking mode for extended periods, consider a dedicated dash cam battery pack for ultimate peace of mind.
- Loose Connections:
- If any functionality is intermittent, re-check all crimped connections on your fuse taps and the ground wire connection, ensuring they are tight and secure.
Expert Tips for a Professional Hardwire Installation
To achieve a clean, safe, and reliable hardwire installation, consider these expert recommendations:
- Always Consult Your Vehicle’s Manual: This cannot be stressed enough. It’s your definitive guide for fuse box locations, diagrams, and specific instructions for your car model.
- Double-Check All Connections: Before reassembling any interior panels, perform thorough tests. It’s much easier to troubleshoot with wires exposed.
- Use a Multimeter for Accuracy: A multimeter or circuit tester is invaluable for confidently identifying the correct power sources, reducing guesswork and potential mistakes.
- Route Cables Away from Sensitive Electronics and Airbags: Plan your cable path carefully to avoid interfering with any critical vehicle systems or safety features like airbags.
- If Unsure, Seek Professional Installation: While hardwiring is a common DIY project, if you’re uncomfortable working with electrical systems or lack the necessary tools, it’s always best to seek assistance from a qualified automotive technician or a dash cam installation specialist.
 A professionally installed dash cam setup with hidden wires and optimal placement
Conclusion
Hardwiring your dash cam to the fuse box is a significant upgrade that enhances your vehicle’s security, offers peace of mind with 24/7 parking surveillance, and provides a clean, integrated setup. By following this comprehensive guide, you can confidently undertake this DIY project, ensuring your dash cam operates at its full potential. From identifying crucial power sources to neatly concealing cables, a successful hardwire installation means your dash cam is always ready to capture critical footage, whether you’re driving or parked. So, are you ready to unlock superior protection for your vehicle and gain the confidence that comes with continuous dash cam coverage?
Frequently Asked Questions
Is hardwiring a dash cam bad for my car battery?
Hardwiring is generally safe when using a quality hardwire kit that includes a low-voltage cutoff. This critical safety feature automatically shuts off power to the dash cam if your car battery’s voltage drops below a preset level, preventing excessive discharge and ensuring your car starts reliably.
How long does it take to hardwire a dash cam?
For individuals new to car electrical work, hardwiring a dash cam can take anywhere from 1 to 3 hours, depending on the complexity of their vehicle’s fuse box and their familiarity with the tools. Experienced DIYers might complete the task in under an hour.
Can I hardwire a dash cam without a fuse tap?
While technically possible to splice into existing wires, it is strongly not recommended. Fuse taps (add-a-circuits) provide a safe, reversible, and non-destructive method to draw power, protecting both your Dash Cam and your vehicle’s original electrical circuits from potential damage.
What’s the difference between ACC and constant power?
ACC (Accessory) power is a switched power source that becomes active only when your car’s ignition is turned on, and it powers off when the ignition is off. Constant power, conversely, provides continuous electricity to the circuit even when the vehicle’s engine is off, which is essential for enabling parking mode.
Do I need a professional to hardwire my dash cam?
Hardwiring can be a rewarding DIY project for individuals with basic electrical knowledge and comfort using hand tools. However, if you are uncertain about any step, lack the necessary equipment, or prefer to avoid working with your vehicle’s electrical system, professional installation is always a recommended and safer option.