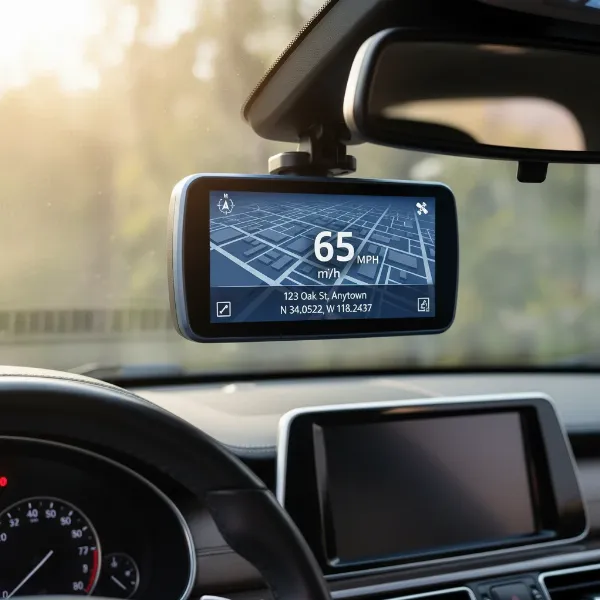
Securing your vehicle, even when you’re not in it, has become a top priority for many drivers. Dash cams offer an invaluable layer of protection, acting as silent witnesses to bumps, scrapes, and unfortunate incidents that occur while your car is parked. However, enabling this crucial “parking mode” functionality often requires more than just plugging your dash cam into the cigarette lighter socket. It demands a dedicated power solution: a hardwire kit. But what’s the difference between a 2-wire and a 3-wire hardwire kit, and which one is right for you? Let’s dive deep into these essential dash cam accessories to ensure your ride stays protected around the clock.
Understanding Dash Cam Hardwire Kits
A dash cam hardwire kit is a specialized cable designed to connect your dash cam directly to your vehicle’s electrical system, usually via the fuse box. This connection offers several significant advantages over simply using the cigarette lighter port. Firstly, it provides continuous power to your dash cam, enabling parking mode features that monitor your vehicle even when the ignition is off. Secondly, hardwiring results in a much cleaner, more professional installation, eliminating messy dangling wires and freeing up your car’s power sockets for other devices. Ultimately, a hardwired setup ensures your dash cam is always ready to record, providing reliable surveillance and peace of mind.
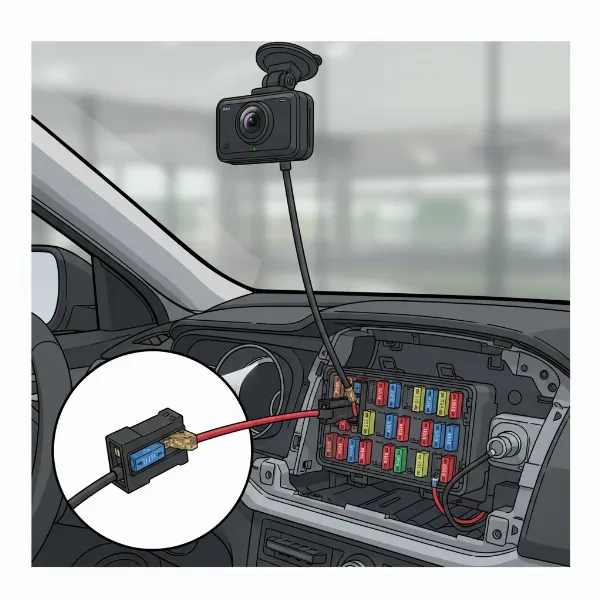 Dash cam hardwire kit connecting to a car's fuse box for continuous power.
The 2-Wire Hardwire Kit: Simplicity for Basic Surveillance
A 2-wire hardwire kit is the more straightforward of the two options. It typically consists of two main connections: a constant power wire (often yellow or red) and a ground wire (black).
- Constant Power (BATT): This wire connects to a fuse in your car’s fuse box that provides continuous power, even when your vehicle’s ignition is turned off.
- Ground (GND): This wire connects to a metal point on your car’s chassis, ensuring a safe electrical circuit.
How It Works
|
Our Picks for the Best Dash Cam in 2026
As an Amazon Associate I earn from qualifying purchases.
|
||
| Num | Product | Action |
|---|---|---|
| 1 | WOLFBOX G840S 12" 4K Mirror Dash Cam Backup Camera, 5.8GHz WiFi Smart Rearview Mirror for Cars & Trucks, Front and Rear View Dual Cameras, Night Vision, Parking Assistance, Included 32GB Card & GPS |

|
| 2 | Dash Cam Front and Rear, 1080P Dash Camera for Cars, 3 Channel Car Camera Front Rear and Inside with 32GB Card, Loop Recording, Night Vision, HDR, 24Hr Parking, G-Sensor |
|
| 3 | Dual 4K Dash Cam Front and Rear - Free 64G SD Card, 2160P+2160P UHD Dash Camera for Cars, Dashcam with 176°+160° Wide Angle, 3.5'' IPS Screen Dashcam, G-Sensor, WDR, Night Vision, 24H Parking Monitor |
|
| 4 | VIOFO A229 Plus Dash Cam Front and Rear, Dual STARVIS 2 Sensors, 2 Channel HDR, 1440P+1440P Voice Control Car Dash Camera, 5GHz Wi-Fi, Voice Control, Ultra-Precise GPS |
|
| 5 | Garmin Dash Cam™ Mini 3, Ultracompact 1080p HD Dash Cam with a 140-degree Field of View, Built in Clarity™ Polarizer, Voice Controlled, Automatic Recording |
|
| 6 | REDTIGER 4K Dash Cam Front Rear, STARVIS 2 Sensor, Free Card Included, 5.8GHz WiFi-20MB/s Fast Download, Dash Camera for Cars with GPS, WDR Night Vision, 170°Wide Angle, 24H Parking Mode(F7NP) |
|
| 7 | 4K+4K Dash Cam Front and Rear, Free 128GB Card Included, 5.8GHz WiFi Dash Camera for Cars, Built-in GPS, G-Sensor, 170°Wide Angle, 3" IPS Screen, 24H Parking Mode, Support 512GB Max |
|
| 8 | ROVE R2-4K DUAL Dash Cam Front and Rear, STARVIS 2 Sensor, FREE 128GB Card Included, 5G WiFi - up to 20MB/s Fastest Download Speed with App, 4K 2160P/FHD Dash Camera for Cars, 3" IPS, 24H Parking Mode |
|
| 9 | 4K Dash Cam Front, Built-in 5G WiFi, 64GB Card Included, Dash Camera for Cars, Mini Dashcam with Super Night Vision, Loop Recording, G-Sensor, 24 Hours Parking Monitor, Support 256GB Max |
|
| 10 | Dash Cam Front and Rear, 2.5K Dual Dash Camera for Cars, 2560P Mini Car Camera, 2 inch IPS Screen, 32GB Card Included, WDR Night Vision, 24 Hours Parking Monitor, G-Sensor, Support 256 GB Max |
|
With a 2-wire kit, your dash cam receives constant power from the vehicle’s battery. This means the dash cam technically remains “on” all the time. For parking mode to function, the dash cam itself must have built-in motion detection capabilities. When the vehicle is parked and the ignition is off, the dash cam uses its internal sensors to detect movement or impacts, triggering a recording.
Pros and Cons
Pros:
- Simpler Installation: With fewer wires to connect, a 2-wire kit is generally easier and quicker to install for DIY enthusiasts.
- Budget-Friendly: These kits are often less expensive than their 3-wire counterparts.
- Basic 24/7 Recording: If your dash cam has reliable motion detection, this kit allows for continuous monitoring.
Cons:
- Limited Parking Mode Features: Without an ignition-switched wire, the dash cam cannot intelligently differentiate between driving and parking modes based on the car’s status. It relies solely on its internal logic.
- Potential for Battery Drain: While some 2-wire kits include basic low voltage protection (LVP), they might be less sophisticated than those found in 3-wire kits. If the LVP is inadequate or absent, continuous recording could drain your car’s battery over extended periods.
- Less Intelligent Operation: The dash cam may not automatically switch to a lower-power parking mode unless it’s designed to do so purely based on lack of motion for a set period.
Best For: A 2-wire hardwire kit is suitable for drivers who primarily want simple 24/7 recording and whose dash cam offers robust internal motion detection. It’s also a good choice for those on a tighter budget or who prefer a simpler installation process.
The 3-Wire Hardwire Kit: Smart Power for Advanced Protection
The 3-wire hardwire kit is considered the gold standard for comprehensive dash cam protection, especially for advanced parking modes. It includes three distinct connections: a constant power wire, an accessory/ignition power wire, and a ground wire.
- Constant Power (BATT/Yellow): Like the 2-wire kit, this connects to a fuse that provides power even when the car is off.
- Accessory/Ignition Power (ACC/Red): This is the key difference. It connects to a fuse that only receives power when your car’s ignition is on (or in accessory mode). This wire acts as a signal, telling the dash cam when the vehicle is running and when it’s parked.
- Ground (GND/Black): Connects to the car’s metal chassis.
How It Works
The presence of the accessory wire allows the dash cam to “know” whether the car is running or parked. When the ignition is turned on, the ACC wire receives power, signaling the dash cam to enter its normal driving recording mode. When the ignition is turned off, power to the ACC wire ceases, prompting the dash cam to automatically switch into its dedicated parking mode. This intelligent switching is crucial for leveraging advanced parking surveillance features like impact detection, buffered recording (saving footage before and after an event), or time-lapse recording, which conserves power and storage space.
Key Feature: Low Voltage Protection (LVP)
One of the most critical aspects of a 3-wire hardwire kit is its integrated Low Voltage Protection (LVP) module. This feature actively monitors your car’s battery voltage and will automatically cut power to the dash cam if the battery drops below a predetermined safe level. This prevents the dash cam from completely draining your vehicle’s battery, ensuring you can always start your car. Many LVP modules are adjustable, allowing you to set the cutoff voltage (e.g., 11.8V, 12.0V, 12.2V, or 12.4V) according to your vehicle’s battery type and your preferences.
Pros and Cons
Pros:
- Advanced Parking Modes: Fully unlocks your dash cam’s parking surveillance capabilities, offering more sophisticated recording options like buffered event recording, time-lapse, and precise motion/impact detection.
- Intelligent Mode Switching: The dash cam automatically transitions between driving and parking modes, ensuring optimal recording based on vehicle status.
- Superior Battery Protection: Integrated LVP safeguards your car battery from excessive drain, a vital feature for 24/7 monitoring.
- Enhanced Security: Provides comprehensive coverage for incidents while parked, such as hit-and-runs or vandalism.
Cons:
- More Complex Installation: Connecting three wires to specific fuse slots (constant and accessory) requires more effort and careful identification compared to a 2-wire setup.
- Generally Higher Cost: Due to the added functionality and built-in LVP, 3-wire kits are typically more expensive.
Best For: A 3-wire hardwire kit is the ideal choice for drivers who prioritize robust parking protection and want to utilize all the advanced features of their modern dash cam. If you’re serious about safeguarding your vehicle against potential parking incidents and want the best possible battery management, this is the way to go.
2-Wire vs. 3-Wire: A Direct Comparison
To help you visualize the differences, here’s a direct comparison of 2-wire and 3-wire hardwire kits:
| Feature | 2-Wire Hardwire Kit | 3-Wire Hardwire Kit |
|---|---|---|
| Wires | Constant Power, Ground | Constant Power, Accessory/Ignition Power, Ground |
| Parking Mode Logic | Relies on dash cam’s internal motion detection only | Intelligent switching based on ignition status (ACC wire) |
| Battery Protection | Basic or no Low Voltage Protection (LVP) | Advanced, often adjustable Low Voltage Protection (LVP) built-in |
| Installation | Simpler, fewer connections | More complex, requires identifying both constant and accessory fuses |
| Cost | Lower | Higher |
| Ideal Use | Basic 24/7 recording, simpler dash cams | Full-featured parking modes, modern dash cams, enhanced security |
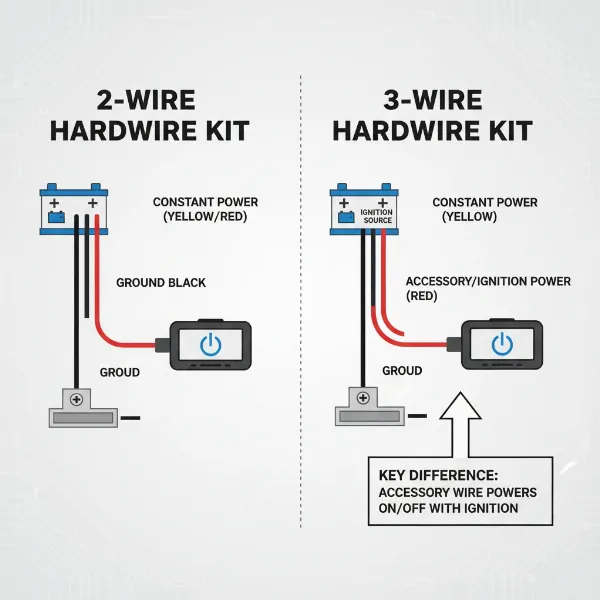 Diagram comparing 2-wire and 3-wire dash cam hardwire kits wiring.
Choosing the Right Hardwire Kit for Your Dash Cam
Selecting the correct hardwire kit is essential for maximizing your dash cam’s performance and ensuring your vehicle’s electrical system remains healthy. Here’s how to make an informed decision:
- Check Your Dash Cam’s Capabilities: Does your dash cam specifically advertise advanced parking modes (e.g., buffered recording, time-lapse, specific impact detection) that require an ignition-switched power source? If so, a 3-wire kit is likely necessary to unlock these features. Many modern dash cams are designed with 3-wire kits in mind.
- Evaluate Your Parking Security Needs: If you park in high-risk areas or simply want the most comprehensive surveillance possible, the intelligent switching and robust battery protection of a 3-wire kit are invaluable. For minimal needs, a 2-wire might suffice, provided your dash cam has decent motion detection.
- Consider Your Installation Comfort Level: While both installations can be DIY, a 3-wire kit requires identifying two different fuse types (constant and accessory), which might be slightly more challenging. If you’re unsure, consulting a professional installer is always a wise choice.
- Factor in Your Budget: 2-wire kits offer a more economical entry point into hardwiring, but the added cost of a 3-wire kit can be seen as an investment in superior protection and battery longevity.
Remember, the goal is seamless integration and reliable performance. A 3-wire kit often provides the best balance of functionality and protection for most contemporary dash cam users.
“Choosing the right hardwire kit isn’t just about getting power to your dash cam; it’s about enabling its full potential and ensuring your car’s electrical system stays safe. Always match the kit to your dash cam’s parking mode features for optimal results.” – Admin, Dashcamon.com
Installation Tips and Best Practices
Hardwiring a dash cam, while sometimes daunting, is a manageable process with the right approach. Here are some key tips for a successful installation:
- Locate Your Fuse Box: Your vehicle’s fuse box is typically located under the dashboard, in the glove compartment, or sometimes in the engine bay. Consult your car’s owner’s manual for its exact location.
- Identify Suitable Fuse Slots:
- Constant Power (for BATT wire): Look for a fuse that always has power, even when the ignition is off. Common examples include fuses for the horn, interior lights, or door locks. Use a multimeter or a circuit tester to verify.
- Accessory Power (for ACC wire, 3-wire kits only): Find a fuse that receives power only when the ignition is on. Fuses for the radio, cigarette lighter (if switched), or windshield wipers are often good candidates.
- Use Fuse Taps Correctly: Hardwire kits usually come with fuse taps (add-a-circuit devices). These allow you to safely “piggyback” off an existing fuse without cutting any wires. Insert the original fuse into the tap’s lower slot, and a new, appropriately rated fuse for the dash cam into the upper slot.
- Secure the Ground Connection: Connect the ground wire to an unpainted metal bolt or screw on your vehicle’s chassis, ensuring a solid electrical return path.
- Route Wires Neatly: Use a trim removal tool to tuck the dash cam cable and hardwire kit wires along the windshield, under the headliner, and behind interior panels for a clean, factory-installed look.
- Test Thoroughly: Before finalizing the installation, start your car, turn it off, and test the dash cam’s operation in both driving and parking modes. Verify the LVP settings are correct to prevent battery drain.
By following these steps, you can achieve a reliable and discreet hardwire installation that empowers your dash cam with its full parking mode capabilities.
Conclusion
Choosing between a 2-wire and a 3-wire hardwire kit is a crucial decision for any dash cam owner looking to utilize parking mode. While 2-wire kits offer a simpler, budget-friendly approach to continuous power, they generally provide only basic parking surveillance functionality. In contrast, 3-wire hardwire kits, with their intelligent ignition-switched power and integrated Low Voltage Protection, are the superior choice for unlocking advanced parking modes and ensuring robust battery health. They allow your dash cam to intelligently detect when your vehicle is parked or driving, providing comprehensive, worry-free protection.
Ultimately, your decision should align with your specific dash cam’s features, your parking security needs, and your comfort with installation complexity. Are you ready to elevate your vehicle’s surveillance and enjoy unparalleled peace of mind?
Frequently Asked Questions
What is the main difference between 2-wire and 3-wire hardwire kits?
The primary difference is the presence of an accessory (ACC) wire in a 3-wire kit. This extra wire allows the dash cam to detect when the ignition is on or off, enabling intelligent switching between driving and parking modes and more sophisticated parking surveillance features.
Can a 2-wire hardwire kit provide parking mode?
Yes, a 2-wire kit can provide parking mode if your dash cam has built-in motion detection. However, it relies solely on the dash cam’s internal logic for mode switching, lacking the intelligent ignition-based activation of a 3-wire system.
Do hardwire kits drain your car battery?
Hardwire kits draw power from your car’s battery. To prevent draining, most quality hardwire kits, especially 3-wire versions, include Low Voltage Protection (LVP) that automatically cuts power to the dash cam if the battery voltage drops too low.
Is a 3-wire hardwire kit worth the extra cost and effort?
For most modern Dash Cams and drivers prioritizing comprehensive vehicle security, a 3-wire kit is highly recommended. It unlocks advanced parking modes, offers superior battery protection, and provides more reliable, intelligent operation, making the investment worthwhile.
What fuses should I use for hardwiring my dash cam?
For a 3-wire kit, you’ll need one fuse slot that’s always powered (constant power, e.g., horn or interior lights) and one that’s only powered with the ignition on (accessory power, e.g., radio or cigarette lighter). Always verify with a multimeter or circuit tester.
Can I install a hardwire kit myself?
Yes, many people successfully install hardwire kits themselves. The process involves identifying fuse slots, using fuse taps, and securing a ground connection. If you’re comfortable with basic automotive wiring and have the right tools, it’s a DIY-friendly project. However, consulting a professional is advisable if you are unsure.