Driving on today’s roads can be unpredictable, making a dash cam an invaluable co-pilot for documenting your journeys. But what exactly ensures those critical moments—sudden stops, unexpected impacts, or even parking lot mishaps—are reliably captured and saved? The answer often lies in a sophisticated piece of technology known as the G-sensor. This small but mighty component can be the difference between having crucial video evidence and wishing you had. In this comprehensive guide, we’ll demystify the dash cam G-sensor, explain its vital role, and provide expert advice on setting the optimal sensitivity to ensure your device performs exactly when you need it most.
The Core Function of a Dash Cam G-Sensor
At its heart, a G-sensor, often referred to as a gravity sensor, is an accelerometer embedded within your dash cam. This sensor is designed to detect and measure gravitational forces, or “G-forces,” acting upon your vehicle. Essentially, it continuously monitors for abrupt changes in motion, whether it’s a sudden deceleration from hard braking, a sharp turn, or the force generated by a collision.
When the G-sensor registers a significant G-force that exceeds a predefined threshold, it automatically triggers a critical action: it locks the currently recording video file. This locked file is then protected from the dash cam’s normal loop recording function, which would otherwise overwrite older footage when the memory card is full. This ensures that vital video evidence, such as an accident, a hit-and-run, or even aggressive driving incidents, is preserved and readily available for review, insurance claims, or legal purposes. The G-sensor acts as your dash cam’s guardian, securing the truth of what happened on the road.
G-Sensor Sensitivity: Why It Matters
The effectiveness of your dash cam’s G-sensor largely depends on its sensitivity settings. These settings determine how much force is required to trigger the sensor and lock a video file. Most dash cams typically offer adjustable sensitivity levels, commonly categorized as “Low,” “Medium,” and “High,” and sometimes an “Off” option.
Choosing the right sensitivity is crucial for balancing reliable incident capture with the avoidance of false positives. If the sensitivity is set too high, minor road imperfections like potholes, speed bumps, or even heavy braking can unnecessarily trigger the G-sensor, leading to a memory card quickly filling up with protected, non-critical files. Conversely, if the sensitivity is too low, the dash cam might fail to register genuine impacts or sudden events, meaning the very footage you need most could be missed or overwritten. Striking the right balance ensures your dash cam efficiently captures essential events without overwhelming your storage with irrelevant data.
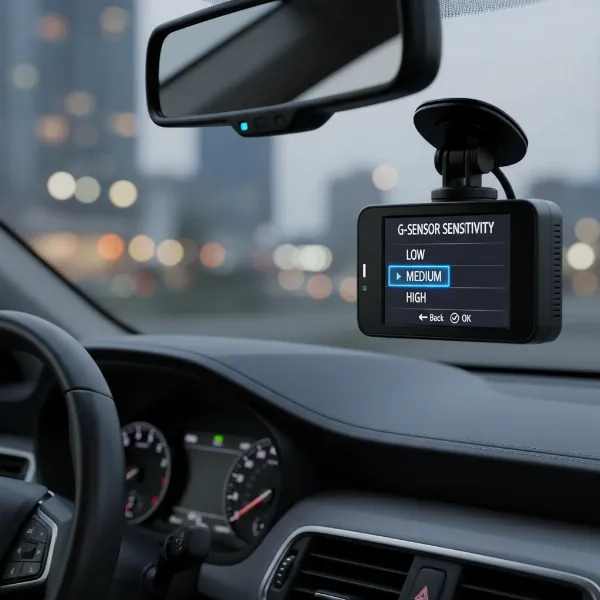 Dash cam G-sensor sensitivity settings interface with low, medium, and high options, in a car interior.
Navigating Different Dash Cam G-Sensor Modes
The G-sensor’s operation can differ based on your vehicle’s status, particularly between driving and parking modes. Understanding these distinctions is key to maximizing your dash cam’s protective capabilities.
Driving Mode
|
Our Picks for the Best Dash Cam in 2026
As an Amazon Associate I earn from qualifying purchases.
|
||
| Num | Product | Action |
|---|---|---|
| 1 | 4K Dash Cam Front, Built-in 5G WiFi, 64GB Card Included, Dash Camera for Cars, Mini Dashcam with Super Night Vision, Loop Recording, G-Sensor, 24 Hours Parking Monitor, Support 256GB Max |

|
| 2 | WOLFBOX G840S 12" 4K Mirror Dash Cam Backup Camera, 5.8GHz WiFi Smart Rearview Mirror for Cars & Trucks, Front and Rear View Dual Cameras, Night Vision, Parking Assistance, Included 32GB Card & GPS |
|
| 3 | Dual 4K Dash Cam Front and Rear - Free 64G SD Card, 2160P+2160P UHD Dash Camera for Cars, Dashcam with 176°+160° Wide Angle, 3.5'' IPS Screen Dashcam, G-Sensor, WDR, Night Vision, 24H Parking Monitor |
|
| 4 | Garmin Dash Cam™ Mini 3, Ultracompact 1080p HD Dash Cam with a 140-degree Field of View, Built in Clarity™ Polarizer, Voice Controlled, Automatic Recording |
|
| 5 | Dash Cam Front and Rear, 2.5K Dual Dash Camera for Cars, 2560P Mini Car Camera, 2 inch IPS Screen, 32GB Card Included, WDR Night Vision, 24 Hours Parking Monitor, G-Sensor, Support 256 GB Max |
|
| 6 | ROVE R2-4K DUAL Dash Cam Front and Rear, STARVIS 2 Sensor, FREE 128GB Card Included, 5G WiFi - up to 20MB/s Fastest Download Speed with App, 4K 2160P/FHD Dash Camera for Cars, 3" IPS, 24H Parking Mode |
|
| 7 | VIOFO A229 Plus Dash Cam Front and Rear, Dual STARVIS 2 Sensors, 2 Channel HDR, 1440P+1440P Voice Control Car Dash Camera, 5GHz Wi-Fi, Voice Control, Ultra-Precise GPS |
|
| 8 | REDTIGER 4K Dash Cam Front Rear, STARVIS 2 Sensor, Free Card Included, 5.8GHz WiFi-20MB/s Fast Download, Dash Camera for Cars with GPS, WDR Night Vision, 170°Wide Angle, 24H Parking Mode(F7NP) |
|
| 9 | Dash Cam Front and Rear, 1080P Dash Camera for Cars, 3 Channel Car Camera Front Rear and Inside with 32GB Card, Loop Recording, Night Vision, HDR, 24Hr Parking, G-Sensor |
|
| 10 | 4K+4K Dash Cam Front and Rear, Free 128GB Card Included, 5.8GHz WiFi Dash Camera for Cars, Built-in GPS, G-Sensor, 170°Wide Angle, 3" IPS Screen, 24H Parking Mode, Support 512GB Max |
|
During active driving, the G-sensor continuously monitors for impacts or sudden movements directly related to the vehicle’s operation. This includes collisions, harsh braking, or abrupt swerving. When such an event occurs and the G-sensor’s threshold is met, it triggers the emergency recording feature, locking the segment of footage before, during, and after the incident. This ensures a comprehensive record of the event. For most everyday driving, a “Medium” sensitivity setting is often recommended as it provides a good balance, capturing significant impacts without being overly reactive to typical road vibrations or minor bumps.
Parking Mode
The G-sensor takes on an even more critical role when your vehicle is parked. In parking mode, the dash cam remains vigilant, typically powered by a hardwire kit connected to your car’s battery. Here, the G-sensor is designed to detect impacts that might occur while your car is stationary, such as a hit-and-run collision in a parking lot. Many dash cams offer different parking mode options, which can be triggered by impact-only or a combination of motion and impact detection. For parking surveillance, a higher G-sensor sensitivity is often advisable, as even minor nudges or scrapes could be important to document. The goal is to capture any interaction with your vehicle, even if it’s not a major collision, providing valuable evidence if your car is damaged while unattended.
How to Set Your G-Sensor Sensitivity
Setting your G-sensor’s sensitivity optimally requires a bit of experimentation, as the ideal level can depend on your vehicle, driving style, and typical driving environment. Most dash cams allow you to access these settings through the device’s menu, usually under “Video Settings” or a dedicated “G-Sensor” option.
General Recommendations:
- Low Sensitivity: Best suited for drivers who frequently travel on rough roads, off-road, or in vehicles with stiff suspensions. This setting helps prevent constant false triggers from vibrations and bumps, preserving memory card space.
- Medium Sensitivity: This is often the default and a well-balanced choice for most drivers and urban/highway conditions. It aims to capture legitimate incidents while minimizing unnecessary recordings.
- High Sensitivity: Ideal if you’re particularly concerned about minor impacts, such as when parking in busy areas or if your vehicle is more susceptible to slight disturbances. Be prepared to manually delete more locked files if you choose this setting. Some dash cams may even offer a numerical scale (e.g., 1-5 or 0.1g-1.5g) allowing for finer adjustments. For parking mode, a slightly higher sensitivity (meaning a lower G-force threshold, e.g., 0.1g-0.5g) is generally recommended to detect even light impacts.
Troubleshooting and Practical Tips:
- Too High Sensitivity: If your dash cam is constantly locking files due to bumps, potholes, or heavy braking that aren’t actual incidents, reduce the sensitivity. You’ll notice the locked file indicator (often a padlock icon) appearing frequently.
- Too Low Sensitivity: If you experience an actual incident but find no locked files, or if minor events go unrecorded, increase the sensitivity.
- Test and Adjust: After changing the setting, drive a familiar route that includes various road conditions. Review the recorded footage and the number of locked files. Adjust as needed until you find a balance that reliably captures events without excess.
- Secure Mounting: Ensure your dash cam is firmly mounted. A loose mount can cause vibrations that falsely trigger the G-sensor, regardless of the sensitivity setting.
Some advanced dash cams even offer calibration options to fine-tune the G-sensor based on the dash cam’s position in the vehicle. Always ensure your dash cam is level for the most accurate readings.
> “The G-sensor is your silent witness, but its voice is only heard clearly when its sensitivity is tuned to your specific driving symphony.” – Admin, Dashcamon.com
Common Questions About Dash Cam G-Sensors
What is the difference between G-sensor and motion detection?
While both features aim to capture events, the G-sensor specifically detects impacts and sudden changes in motion (acceleration), whereas motion detection typically monitors for movement within the camera’s field of view. In parking mode, some dash cams use both: motion detection to start recording and the G-sensor to lock the file if an impact occurs.
Can G-sensor activation drain my car battery?
A G-sensor itself consumes minimal power. However, if it’s constantly triggered in parking mode while your car is off, and without a hardwire kit that manages power, it can contribute to battery drain as the dash cam remains active. A proper hardwire kit is essential for safe and efficient parking mode operation.
How often should I check my G-sensor settings?
It’s a good practice to check your G-sensor settings whenever you change your driving environment significantly (e.g., from smooth highways to rough city roads) or if you notice too many or too few locked files appearing after incidents.
Conclusion
The G-sensor is a fundamental safety feature in modern dash cams, providing an automated layer of protection for capturing critical events. By understanding how this accelerometer works and the nuances of its sensitivity settings, you can ensure your dash cam is optimally configured to serve as an accurate and reliable eyewitness on your daily drives and while parked. A properly adjusted G-sensor not only offers peace of mind but also safeguards the crucial evidence you might need in unforeseen circumstances. Take the time to fine-tune this setting, and you’ll unlock the full potential of your dash cam’s protective capabilities. What’s your experience with G-sensor sensitivity – have you found your perfect balance yet?
Frequently Asked Questions
How do I know if my G-sensor is working correctly?
You can test your G-sensor by gently tapping your securely mounted dash cam or by performing a sudden, controlled brake while driving. Check your dash cam’s memory card for a locked event file (often indicated by a padlock icon) in the designated “event” or “locked” folder.
Should I turn off the G-sensor if I drive on very bumpy roads?
If you frequently drive on extremely bumpy roads and find your Dash Cam constantly creating unnecessary locked files, setting the G-sensor to “Low” is often more practical than turning it completely “Off.” Turning it off means no impacts will be automatically protected.
Does G-sensor sensitivity affect parking mode recording?
Yes, G-sensor sensitivity is particularly important for parking mode. A higher sensitivity setting in parking mode can ensure that even minor bumps or nudges, which might not be strong enough to trigger a lower setting, are detected and recorded, providing crucial evidence for parking lot incidents.