Waking up to review critical dash cam footage, only to find it obscured by an irritating blur, can be incredibly frustrating. A dash cam is an essential guardian on the road, meant to capture every detail, from license plates to road hazards. But when its video turns blurry, its primary purpose is compromised, leaving you with unreliable evidence and a sense of unease. This isn’t just a minor inconvenience; it’s a significant problem that can impact your safety and ability to prove fault in an incident.
As an experienced dash cam technician, I’ve seen countless cases where blurry footage renders a recording useless. Often, the cause isn’t a complex internal fault but rather a straightforward issue that can be diagnosed and resolved with a little know-how. This comprehensive guide will delve into the common reasons behind blurry dash cam videos, specifically addressing focus-related problems. We’ll cover everything from simple external factors to more intricate internal malfunctions, providing clear, actionable steps to troubleshoot and restore your dash cam’s crystal-clear vision. By understanding these issues, you can ensure your dash cam is always ready to capture the sharp, reliable evidence you need on every journey.
Understanding Dash Cam Focus: The Basics
Many dash cams are designed with fixed-focus lenses. This means, unlike some advanced cameras, they don’t have an autofocus mechanism that constantly adjusts for subjects at varying distances. Instead, their lens is set at the factory to maintain optimal sharpness for objects typically found on the road ahead – usually a range from a few feet to infinity. This design simplifies the camera’s mechanics, reduces cost, and makes it robust for continuous recording in a vehicle environment. The expectation is that everything within the camera’s field of view, particularly the road ahead, will remain in sharp focus without active adjustment.
This fixed-focus approach generally works well, ensuring consistent clarity for traffic, road signs, and other vehicles. However, it also means that if the lens’s physical position shifts even slightly from its factory-calibrated setting, the entire image can become uniformly blurry. Since there’s no automatic system to correct this, any deviation from the ideal focus point will result in noticeably unclear footage. Understanding this fundamental aspect of dash cam optics is crucial to diagnosing why your video might be losing its sharpness and how to effectively troubleshoot it.
Common Culprits: Why Your Dash Cam Footage Isn’t Clear
Identifying the root cause of blurry dash cam footage is the first step toward a solution. Many factors can contribute to a lack of clarity, ranging from simple environmental influences to more complex hardware or software issues. Let’s explore the most frequent culprits that degrade your dash cam’s video quality.
The Obvious: Dirty Lens and Protective Film
|
Our Picks for the Best Dash Cam in 2026
As an Amazon Associate I earn from qualifying purchases.
|
||
| Num | Product | Action |
|---|---|---|
| 1 | Dual 4K Dash Cam Front and Rear - Free 64G SD Card, 2160P+2160P UHD Dash Camera for Cars, Dashcam with 176°+160° Wide Angle, 3.5'' IPS Screen Dashcam, G-Sensor, WDR, Night Vision, 24H Parking Monitor |

|
| 2 | Dash Cam Front and Rear, 1080P Dash Camera for Cars, 3 Channel Car Camera Front Rear and Inside with 32GB Card, Loop Recording, Night Vision, HDR, 24Hr Parking, G-Sensor |
|
| 3 | Garmin Dash Cam™ Mini 3, Ultracompact 1080p HD Dash Cam with a 140-degree Field of View, Built in Clarity™ Polarizer, Voice Controlled, Automatic Recording |
|
| 4 | ROVE R2-4K DUAL Dash Cam Front and Rear, STARVIS 2 Sensor, FREE 128GB Card Included, 5G WiFi - up to 20MB/s Fastest Download Speed with App, 4K 2160P/FHD Dash Camera for Cars, 3" IPS, 24H Parking Mode |
|
| 5 | VIOFO A229 Plus Dash Cam Front and Rear, Dual STARVIS 2 Sensors, 2 Channel HDR, 1440P+1440P Voice Control Car Dash Camera, 5GHz Wi-Fi, Voice Control, Ultra-Precise GPS |
|
| 6 | Dash Cam Front and Rear, 2.5K Dual Dash Camera for Cars, 2560P Mini Car Camera, 2 inch IPS Screen, 32GB Card Included, WDR Night Vision, 24 Hours Parking Monitor, G-Sensor, Support 256 GB Max |
|
| 7 | 4K+4K Dash Cam Front and Rear, Free 128GB Card Included, 5.8GHz WiFi Dash Camera for Cars, Built-in GPS, G-Sensor, 170°Wide Angle, 3" IPS Screen, 24H Parking Mode, Support 512GB Max |
|
| 8 | 4K Dash Cam Front, Built-in 5G WiFi, 64GB Card Included, Dash Camera for Cars, Mini Dashcam with Super Night Vision, Loop Recording, G-Sensor, 24 Hours Parking Monitor, Support 256GB Max |
|
| 9 | REDTIGER 4K Dash Cam Front Rear, STARVIS 2 Sensor, Free Card Included, 5.8GHz WiFi-20MB/s Fast Download, Dash Camera for Cars with GPS, WDR Night Vision, 170°Wide Angle, 24H Parking Mode(F7NP) |
|
| 10 | WOLFBOX G840S 12" 4K Mirror Dash Cam Backup Camera, 5.8GHz WiFi Smart Rearview Mirror for Cars & Trucks, Front and Rear View Dual Cameras, Night Vision, Parking Assistance, Included 32GB Card & GPS |
|
One of the most overlooked, yet easily rectifiable, causes of blurry video is a dirty dash cam lens or windscreen. Over time, dust, fingerprints, smudges, road grime, and even water spots can accumulate on the lens or the section of the windshield it views through. This creates a hazy layer that obstructs the camera’s view, making footage appear blurry or smeared. It’s a bit like trying to look through a dirty window yourself – everything outside loses its sharpness.
Even simpler, many new dash cams come with a thin, clear protective film over the lens to prevent scratches during shipping. It’s surprisingly common for users to forget to peel this film off, leaving it in place to continuously blur their recordings. This protective layer, while intended for temporary use, can significantly degrade image quality, especially under bright lights where it might cause glare or diffusion. Checking for and removing this film should always be one of the first troubleshooting steps.
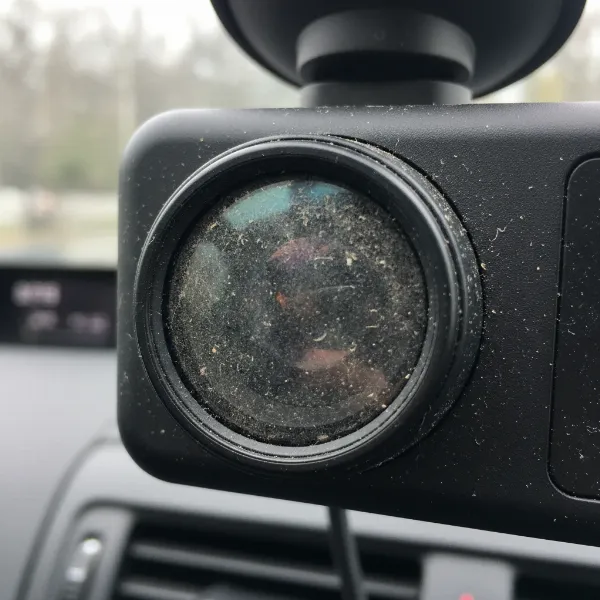 A close-up of a dash cam lens covered in dust and smudges, illustrating a common cause of blurry video.
Environmental Impact: Heat and Condensation
Dash cams operate in challenging environments, often exposed to extreme temperature fluctuations inside a parked car. These conditions can have a direct impact on the camera’s optics. High temperatures, particularly during summer, can cause the lens assembly components to expand or even slightly shift out of their fixed-focus position. This “focus shift” might be temporary, improving as the temperature cools, or it could become a permanent displacement requiring manual adjustment or replacement.
Similarly, rapid temperature changes or high humidity can lead to condensation forming either on the exterior of the lens or, more problematically, inside the lens housing or on the camera sensor itself. This moisture acts like a fog, creating a hazy, diffused, or genuinely blurry effect on the video. Condensation inside the camera is a serious issue that can be challenging to resolve without professional intervention and may indicate a breach in the camera’s sealing.
Lighting Limitations: Low Light and Overexposure
Dash cams, especially those with smaller image sensors (which most consumer models have due to size and cost constraints), inherently struggle in challenging lighting conditions. In low-light environments, such as during nighttime driving, tunnels, or heavily shaded areas, the camera’s sensor receives less light. To compensate, the camera might boost its signal, leading to increased digital noise or “graininess” that makes the footage appear blurry and details hard to distinguish. If the camera uses a slower shutter speed to capture more light, any motion from your vehicle or other objects can result in motion blur, where moving subjects appear as streaks rather than sharp images.
Conversely, excessively bright conditions, such as direct sunlight or headlights at night, can cause overexposure. This results in “blown out” areas in the footage where details are lost in bright white, making objects like license plates unreadable. While not strictly a focus issue, these lighting extremes significantly impact the perceived clarity and usability of your dash cam recordings.
Placement Problems: Mounting and Angle Misfires
The physical positioning and angle of your dash cam play a crucial role in the clarity of its footage. An improperly mounted dash cam can lead to several clarity issues. If the camera is not firmly affixed to the windshield, vibrations from driving can cause subtle shakiness in the video, resulting in a persistent blur. This is often more noticeable at higher speeds or on rough roads.
Furthermore, the angle at which the dash cam points is critical. If it’s tilted too high, it might capture too much sky, leading to overexposed skies and underexposed, dark road details. If it’s angled too low, it might focus on your car’s dashboard reflections rather than the road ahead, creating a blurry foreground and a distorted view. Reflections from the dashboard or windshield, particularly in bright sunlight, can also introduce glare and haze, obscuring the view. Proper placement ensures the camera has an unobstructed view of the road, minimizing these reflective interferences.
Software Snags: Settings and Playback Issues
Sometimes, the blurriness isn’t a physical camera issue but rather a consequence of software settings or how the footage is being viewed. Dash cams offer various settings, including resolution, frame rate, and exposure value. If these settings are not optimized, they can impact video clarity. For instance, a lower resolution might be chosen to save storage space, but it inevitably leads to less detailed and potentially blurrier footage.
Moreover, how you play back the video can significantly affect its apparent quality. Many users first review footage on their smartphone via a dash cam app, which often uses heavy compression or lower resolution streams for quick viewing. This can make perfectly clear original footage appear pixelated or blurry on the small screen. The same can happen with certain media players on a computer that downscale video or lack robust decoding capabilities. Always verify footage using the original file on a computer with a reliable media player before assuming the camera is at fault.
Hardware Hiccups: Internal Malfunctions
While less common, internal hardware problems can also cause dash cam video to become blurry. A manufacturing defect, a damaged lens element, or a faulty image sensor can directly impact the camera’s ability to capture sharp images. In some cases, the sensor itself might have slightly shifted out of alignment, leading to a persistent, uncorrectable blur.
> “Dash cams are designed for resilience, but extreme conditions or inherent defects can compromise their internal components. A subtle misalignment in the optics or a failing sensor can manifest as persistent blur that no external cleaning or setting adjustment can fix.” – Admin, Dashcamon.com, Dash Cam Expert
These issues are generally more serious and typically require professional repair or, more often, a replacement of the dash cam, especially if it’s still under warranty. Distinguishing between a simple external problem and a complex internal fault is key to efficient troubleshooting.
Troubleshooting Steps: Bringing Clarity Back to Your Recordings
When your dash cam starts producing blurry video, it’s natural to feel concerned. However, many common focus issues can be resolved with a methodical approach. Here’s a step-by-step guide to troubleshooting and improving the clarity of your dash cam footage.
Start Simple: Clean Your Lens and Remove Film
Before delving into complex diagnostics, always begin with the simplest solutions.
- Inspect the Lens: Carefully examine the dash cam lens for any visible dirt, dust, smudges, or fingerprints. Also, check the section of the windshield that the camera views through.
- Gentle Cleaning: Turn off your dash cam and unplug it. Use a soft, clean microfiber cloth specifically designed for optics. Lightly wipe the lens in a circular motion. For stubborn marks, slightly dampen the cloth with a specialized lens cleaning solution or a small amount of isopropyl alcohol. Never spray cleaner directly onto the lens.
- Check for Protective Film: Thoroughly check if there’s a thin, clear plastic film still adhering to the lens. This film is often hard to spot but can drastically reduce clarity. If present, carefully peel it off.
Optimize Your Dash Cam’s Position
Correct mounting is fundamental for clear footage and can prevent many blur-related issues.
- Stable Mount: Ensure your dash cam is securely mounted to the windshield or dashboard, minimizing vibrations. Loose mounts are a common cause of shaky, blurry video.
- Unobstructed View: Position the camera where it has a clear, unobstructed view of the road, avoiding wipers, rearview mirror housing, or dashboard reflections.
- Optimal Angle: Angle the dash cam so that approximately 60% of the frame captures the road and 40% captures the sky. This balance helps the camera expose correctly without overexposing the sky or underexposing the road. Adjust the angle until reflections from the dashboard are minimized.
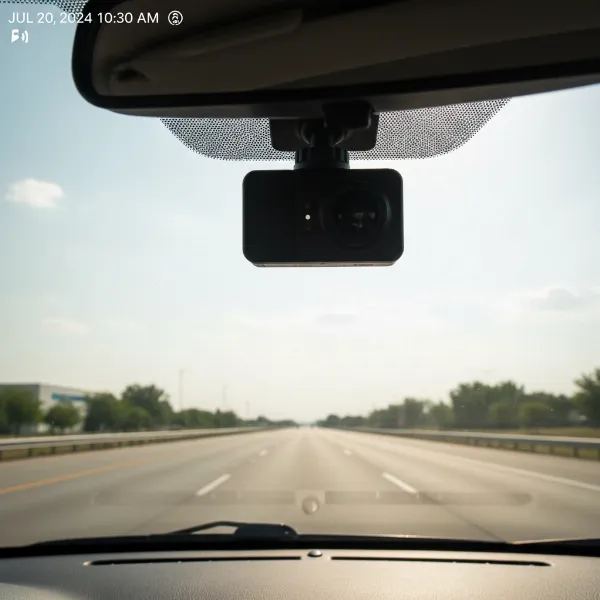 A dash cam correctly mounted on a car's windshield, showing an ideal angle for clear road footage.
Adjust Your Camera Settings for Optimal Clarity
Dash cam settings can significantly influence video quality.
- Resolution and Frame Rate:
- Resolution: Always set your dash cam to the highest resolution it supports (e.g., 1080p, 2K, or 4K) unless storage space is an extreme concern. Higher resolution means more detail.
- Frame Rate: A higher frame rate (e.g., 60 frames per second or 60fps) generally results in smoother video and can reduce motion blur, especially when capturing fast-moving objects or driving at high speeds.
- Exposure Value (EV):
- Many dash cams allow you to adjust the exposure value. If your footage appears too dark or grainy in low light (e.g., cloudy days or nighttime), try increasing the EV (e.g., to +0.5 or +1.0). This brightens the image.
- Conversely, if footage is consistently overexposed with blown-out highlights in bright conditions, slightly decreasing the EV (e.g., to -0.5) can help. Experiment with these settings to find the optimal balance for your driving environment.
Verify Footage on a Computer
Don’t jump to conclusions based solely on smartphone playback.
- Use Original Files: Remove the microSD card from your dash cam and insert it into a computer.
- Reliable Player: Use a dedicated video player on your computer (like VLC Media Player) to view the original .MP4 video files directly from the card. This bypasses any compression or display limitations of your phone or other apps.
- Full Resolution Check: Ensure your computer monitor’s resolution can adequately display the dash cam’s footage. Viewing 4K footage on a 1080p monitor, for example, will involve downscaling that might affect perceived sharpness. Zoom in on a static frame if your player allows to check for true detail.
Addressing Internal Issues: When to Seek Professional Help
If external cleaning, positioning, and setting adjustments don’t resolve the blurriness, the issue might be internal.
- Condensation Inside: If you suspect moisture inside the lens, try placing the dash cam in a dry, warm environment or a sealed bag with silica gel packets for a few days. If the blur persists, professional service might be needed.
- Focus Shift Due to Heat: Dash cam lenses are fixed but can shift permanently with extreme heat. Some advanced users might attempt to carefully disassemble the camera and manually adjust the lens’s focus by rotating it slightly. This is a delicate procedure that can void warranties and potentially damage the camera. It’s generally recommended only for those with technical expertise.
- Hardware Failure: If all troubleshooting fails, and the camera is still blurry, it’s likely a hardware malfunction (e.g., a faulty sensor or a physically damaged lens element). In this case, contact the manufacturer’s support, especially if the camera is under warranty, for repair or replacement options.
Preventative Measures: Keeping Your Dash Cam Sharp
Proactive maintenance and mindful usage can significantly extend the life of your dash cam and ensure consistently clear footage, preventing blurriness before it starts.
Regular Maintenance
Just like any other piece of equipment in your car, your dash cam benefits from a routine check-up.
- Keep it Clean: Make it a habit to regularly wipe your dash cam lens and the corresponding section of your windshield with a microfiber cloth. This prevents the buildup of dust, grime, and fingerprints that are common culprits of hazy video.
- Check Your Mount: Periodically inspect your dash cam’s mount to ensure it remains secure and tight. Vibrations from a loose mount can gradually lead to blurry video over time, not to mention the risk of the camera falling off.
- Monitor for Condensation: Be aware of environmental conditions, especially rapid temperature changes. If you notice persistent fogging or moisture inside the lens, act quickly by placing the camera in a dry environment to prevent long-term damage.
Mindful Installation
The initial installation of your dash cam sets the foundation for its performance.
- Strategic Placement: Take the time to install your dash cam in a location that offers the clearest, most unobstructed view of the road. Avoid areas that might pick up excessive dashboard reflections or be obscured by windshield wipers. Professional installation can often guarantee optimal positioning and power routing.
- Cable Management: Ensure power cables are routed neatly and securely, not dangling where they can cause accidental jostling or obstruct the camera’s view.
Invest in Quality
While price isn’t always the sole indicator of quality, investing in a reputable dash cam can often translate to better performance and durability.
- Heat Resistance: Look for models known for their durability and heat resistance, especially if you live in a hot climate. Cameras built with higher-quality components and better thermal management are less prone to heat-induced focus shifts.
- Sensor and Optics: Research dash cams with larger image sensors and high-quality glass lenses, as these are inherently better at capturing clear footage, particularly in challenging lighting conditions. Read reviews focusing on real-world video quality, not just advertised resolution.
When to Consider a New Dash Cam
Despite your best efforts in troubleshooting and maintenance, there comes a point when a dash cam’s blurriness might indicate it’s time for a replacement. If your dash cam is consistently producing blurry or unfocused video even after you’ve diligently cleaned the lens, checked for protective film, optimized its position, adjusted all settings, and verified playback on a computer, then a deeper, irreparable issue likely exists. This could be a permanent internal focus shift, a faulty image sensor, or irreversible damage from prolonged heat exposure or moisture ingress.
Consider the age of your dash cam; older models may simply be reaching the end of their lifespan, with components degrading over time. If the cost of professional repair approaches the price of a new, reliable dash cam, replacement is often the more economical and practical choice. A new dash cam can offer improved technology, better low-light performance, enhanced durability, and peace of mind, ensuring your road journeys are always recorded with crystal-clear precision.
Conclusion
A blurry dash cam defeats its very purpose, turning vital visual evidence into unclear guesswork. From simple dust on the lens to more complex internal focus shifts caused by extreme heat, the reasons behind unclear dash cam footage are varied, yet often addressable. By systematically troubleshooting, starting with basic checks like cleaning the lens and removing protective films, then moving to optimizing placement and adjusting settings, many drivers can restore their dash cam’s clarity.
Regular maintenance and thoughtful installation are key preventative measures, ensuring your device remains a reliable witness on the road. Remember, your dash cam is an investment in your safety and security. When all troubleshooting avenues have been exhausted, and blurriness persists, it might be time to consider upgrading to a newer model that offers the consistent, high-definition recording you deserve. Don’t compromise on clarity; ensure your dash cam captures every moment with the precision it was designed for.
What steps will you take today to ensure your dash cam always captures crystal-clear footage?
Frequently Asked Questions
Why does my dash cam video look fine during the day but blurry at night?
This is typically due to low-light limitations. Dash cams often have small image sensors that struggle in darkness, leading to increased digital noise and slower shutter speeds. This can cause motion blur from your vehicle’s movement or a generally grainy, unclear image when there isn’t enough light to capture sharp details.
Can a dash cam lose focus permanently?
Yes, extreme temperatures, especially prolonged heat exposure, can sometimes cause the fixed-focus lens assembly in a dash cam to permanently shift out of alignment. While some minor shifts might be temperature-dependent, a persistent blur regardless of conditions usually indicates a permanent mechanical issue requiring repair or replacement.
Is it safe to try to adjust my dash cam’s lens myself?
Attempting to disassemble your Dash Cam and manually adjust the lens can be risky. It often involves breaking factory seals or glue, which will void your warranty and could easily damage delicate internal components. This is generally recommended only for individuals with significant technical expertise and a willingness to accept the risk.
Does the quality of my microSD card affect video clarity?
While a faulty or slow microSD card primarily causes recording errors (like dropped frames or corrupted files) rather than blur, it can indirectly affect perceived quality. If the card can’t write data fast enough, the camera might be forced to lower its bitrate or compression, which can reduce overall image detail and make the video appear less sharp.