Driving a Tesla offers a futuristic experience, but even the most advanced vehicles benefit from the added protection of a dash cam. While Teslas come equipped with a built-in dashcam feature, many owners seek aftermarket solutions for enhanced video quality, wider fields of view, and more robust parking surveillance. Navigating the installation process in a Tesla can be unique, especially when considering power sources like USB versus 12V, or exploring more advanced hardwiring options. This comprehensive guide will walk you through everything you need to know to equip your Tesla with a dash cam, ensuring peace of mind on every journey.
Understanding Tesla’s Built-in Dashcam
Before diving into aftermarket installations, it’s essential to understand the capabilities and limitations of Tesla’s integrated dashcam system. All Teslas manufactured since July 31, 2017 (with HW2.5 or later) feature a built-in dashcam, utilizing the car’s external cameras for recording. This system, often tied to Sentry Mode, records video footage of your vehicle’s surroundings while driving and when parked.
To use the built-in Dashcam, you need a properly formatted USB flash drive inserted into your Tesla’s USB port. For optimal security and functionality, Tesla recommends using the USB port located in the glovebox, especially for vehicles manufactured after approximately November 1, 2021, as some center console USB ports may only support charging devices. The USB drive must be formatted to exFAT and contain a base-level folder named “TeslaCam.” Recordings are saved locally to this drive and are not sent to Tesla, ensuring your privacy.
While a convenient “free” feature, Tesla’s built-in dashcam has its drawbacks. The video resolution (often 1280 x 960 pixels at 36 fps) can be lower than many aftermarket options, making details like license plates difficult to read beyond a short distance. The field of view might also be narrower, potentially missing critical events outside its scope. Furthermore, the system may lack audio recording and advanced customizable parking modes found in dedicated dash cams. Sentry Mode, while useful, also consumes significant battery power (about one mile of range per hour) to keep the system active while parked. For these reasons, many Tesla owners opt for a dedicated aftermarket dash cam to supplement or replace the factory system for superior recording quality and broader coverage.
Choosing Your Dash Cam Power Source
When installing an aftermarket dash cam in your Tesla, the method you choose to power it is crucial. The primary options are USB, the 12V cigarette lighter socket, or hardwiring, each with distinct advantages and challenges. The ideal choice often depends on whether you require continuous recording for parking mode or just power while driving.
Teslas present unique considerations compared to conventional vehicles, primarily due to their electronic fuse systems and smaller 12V accessory battery that powers electronics. Understanding these differences will help you make an informed decision and avoid potential issues.
Method 1: Simple USB Power (and its limitations)
|
Our Picks for the Best Dash Cam in 2026
As an Amazon Associate I earn from qualifying purchases.
|
||
| Num | Product | Action |
|---|---|---|
| 1 | ROVE R2-4K DUAL Dash Cam Front and Rear, STARVIS 2 Sensor, FREE 128GB Card Included, 5G WiFi - up to 20MB/s Fastest Download Speed with App, 4K 2160P/FHD Dash Camera for Cars, 3" IPS, 24H Parking Mode |

|
| 2 | Garmin Dash Cam™ Mini 3, Ultracompact 1080p HD Dash Cam with a 140-degree Field of View, Built in Clarity™ Polarizer, Voice Controlled, Automatic Recording |
|
| 3 | 4K+4K Dash Cam Front and Rear, Free 128GB Card Included, 5.8GHz WiFi Dash Camera for Cars, Built-in GPS, G-Sensor, 170°Wide Angle, 3" IPS Screen, 24H Parking Mode, Support 512GB Max |
|
| 4 | Dash Cam Front and Rear, 2.5K Dual Dash Camera for Cars, 2560P Mini Car Camera, 2 inch IPS Screen, 32GB Card Included, WDR Night Vision, 24 Hours Parking Monitor, G-Sensor, Support 256 GB Max |
|
| 5 | REDTIGER 4K Dash Cam Front Rear, STARVIS 2 Sensor, Free Card Included, 5.8GHz WiFi-20MB/s Fast Download, Dash Camera for Cars with GPS, WDR Night Vision, 170°Wide Angle, 24H Parking Mode(F7NP) |
|
| 6 | WOLFBOX G840S 12" 4K Mirror Dash Cam Backup Camera, 5.8GHz WiFi Smart Rearview Mirror for Cars & Trucks, Front and Rear View Dual Cameras, Night Vision, Parking Assistance, Included 32GB Card & GPS |
|
| 7 | 4K Dash Cam Front, Built-in 5G WiFi, 64GB Card Included, Dash Camera for Cars, Mini Dashcam with Super Night Vision, Loop Recording, G-Sensor, 24 Hours Parking Monitor, Support 256GB Max |
|
| 8 | Dash Cam Front and Rear, 1080P Dash Camera for Cars, 3 Channel Car Camera Front Rear and Inside with 32GB Card, Loop Recording, Night Vision, HDR, 24Hr Parking, G-Sensor |
|
| 9 | Dual 4K Dash Cam Front and Rear - Free 64G SD Card, 2160P+2160P UHD Dash Camera for Cars, Dashcam with 176°+160° Wide Angle, 3.5'' IPS Screen Dashcam, G-Sensor, WDR, Night Vision, 24H Parking Monitor |
|
| 10 | VIOFO A229 Plus Dash Cam Front and Rear, Dual STARVIS 2 Sensors, 2 Channel HDR, 1440P+1440P Voice Control Car Dash Camera, 5GHz Wi-Fi, Voice Control, Ultra-Precise GPS |
|
For the easiest installation, many dash cams can be powered via a USB port. This is a plug-and-play solution that requires minimal effort.
Installation Steps:
- Identify a Suitable USB Port: In newer Teslas (post-November 2021), the glovebox USB-A port is generally preferred for data and accessories like dash cams. Center console USB-C ports in these models might be charge-only. For older models, front console USB ports may work.
- Mount the Dash Cam: Choose an optimal location on your windshield—high, centered, and out of your line of sight. Ensure it doesn’t obstruct any of Tesla’s internal sensors or cameras.
- Route the USB Cable: Carefully tuck the USB power cable along the headliner, down the A-pillar (ensuring it doesn’t interfere with airbags), and towards your chosen USB port. Use a pry tool to neatly hide the cable behind trim panels and weather stripping for a clean look.
- Plug In and Test: Connect the dash cam to the USB port and verify it powers on and records correctly.
Limitations: The main drawback of USB power in a Tesla is its intermittent nature. Most USB ports in a Tesla power down when the car “goes to sleep,” which typically happens after a period of being parked and locked. This means your dash cam will likely not record continuously in parking mode, leaving your vehicle vulnerable when stationary. If continuous parking surveillance is a priority, USB power alone is not sufficient.
Method 2: 12V Cigarette Lighter Socket Power
Another straightforward method is to power your dash cam using the 12V cigarette lighter socket.
Installation Steps:
- Locate the 12V Socket: Teslas typically have a 12V power outlet, usually located in the center console or occasionally in the trunk.
- Mount the Dash Cam: Similar to USB installation, select an ideal mounting spot on your windshield (front and/or rear).
- Route the Cable: Run the dash cam’s 12V power cable along the headliner, down the A-pillar, and neatly tuck it behind trim panels towards the 12V socket. Ensure the cable is hidden and secured.
- Plug In and Test: Plug the dash cam into the 12V socket and confirm it functions correctly.
Limitations: Like USB ports, Tesla’s 12V power outlet usually turns off when the car is powered down or goes to sleep. This makes it a poor choice for enabling continuous parking mode, as the dash cam will lose power as soon as the vehicle enters its low-power state. While convenient for recording during drives, it doesn’t offer the around-the-clock protection many drivers desire.
Method 3: Hardwiring for Continuous Power (Advanced)
Hardwiring directly to your Tesla’s electrical system can provide continuous power for parking mode, but it comes with unique challenges in electric vehicles.
Challenges in Teslas:
- Small 12V Accessory Battery: Teslas, like other EVs, use a small 12V accessory battery for auxiliary electronics, which is periodically recharged by the main high-voltage battery. Directly hardwiring a dash cam to this small battery can deplete it quickly (e.g., providing only about 4 hours of parking mode recording), potentially leading to a “12V Battery Needs Service” warning or even issues starting your car.
- Lack of Accessible Fusebox (Model 3/Y): Unlike many traditional cars, the Tesla Model 3 often lacks a conventional, easily accessible fusebox for hardwiring. Attempting to tap into certain circuits can even trigger error codes.
- “Smart” Electrical System: Tesla’s sophisticated electronic systems can be sensitive to aftermarket modifications. Some traditional hardwiring kits designed for internal combustion engine (ICE) cars (like BlackVue’s PowerMagic) can interfere with Tesla’s 12V battery management, causing the dash cam to power off prematurely or generate fault messages. It’s often recommended not to use these specific modules in Model S/X, though they might be necessary for Model 3/Y in some scenarios with specific battery pack setups.
Alternative Hardwiring Approaches:
- OBD-II Port: OBD-II cables offer a plug-and-play hardwiring alternative by connecting to the vehicle’s OBD port, often located in the driver’s footwell. This can provide continuous power for parking mode without splicing wires. However, it still draws power from the Tesla’s small 12V accessory battery, meaning parking mode duration might still be limited.
- Specific Tapping Points (Model S/X): For older Model S and X vehicles (pre-June 2021), an “always-on” power source can sometimes be found in the headliner, behind the microphone panel. For switched power (if needed for some dash cam models like Thinkware), wires near the rearview mirror might be tapped. This requires specialized knowledge and tools (e.g., voltmeters, Posi-Taps) and should only be attempted by experienced individuals to avoid damaging vehicle electronics or interfering with safety systems like airbags.
Due to these complexities, directly hardwiring a dash cam for continuous parking mode without an external battery pack is often not the most recommended or straightforward solution for Teslas, especially the Model 3 and Y.
The Recommended Solution: Dash Cam Battery Packs
For Tesla owners prioritizing extended parking mode without risking their vehicle’s 12V battery or electrical system, a dedicated dash cam battery pack is the optimal solution.
How They Work: A dash cam battery pack is an external power source that charges when your Tesla is active (driving or awake) and then powers your dash cam independently when the vehicle is off and asleep. This means your dash cam draws power from its own battery, completely bypassing and protecting your Tesla’s small 12V accessory battery.
Benefits:
- Extended Parking Mode: Battery packs can provide significantly longer parking mode durations (e.g., 24-48 hours or more, depending on the pack and dash cam) compared to direct hardwiring to the Tesla’s 12V battery.
- Protects Tesla’s Battery: Eliminates the risk of draining your Tesla’s 12V battery or triggering error messages.
- Simple Installation: Many battery packs can be connected via a cigarette lighter adapter (CLA) or hardwired to an ignition-switched 12V socket (like the cigarette socket itself), making installation relatively straightforward compared to tapping into the vehicle’s intricate wiring. The battery pack then powers the dash cam.
- Reliability: Provides a consistent and stable power supply for your dash cam, ensuring reliable recording when you need it most.
Installation with a Battery Pack:
- Mount the Dash Cam: Position your dash cam(s) on the windshield.
- Mount the Battery Pack: Find a discreet location for the battery pack, often under a seat, in the center console, or in the sub-trunk.
- Connect to Power: Connect the battery pack to an ignition-switched 12V source in your Tesla. This is typically done by plugging it into the 12V cigarette lighter socket or by hardwiring it to the cigarette lighter circuit (not the car’s 12V battery directly) using a specific hardwire kit provided with the battery pack.
- Connect Dash Cam to Battery Pack: Power your dash cam directly from the battery pack.
- Route Cables: Neatly route all cables along the headliner, A-pillar, and behind interior trim panels to connect the dash cam to the battery pack and the battery pack to its power source.
“For Tesla vehicles, especially the Model 3 without an accessible fusebox, a dedicated dash cam battery pack is often the most reliable way to achieve extended parking mode without compromising the car’s electrical system.”
General Installation Tips for Any Tesla Dash Cam
Regardless of the power source you choose, a clean and safe installation is key for both aesthetics and functionality.
Optimal Dash Cam Placement
- Front Camera: Mount high on the windshield, ideally behind the rearview mirror or to its right, keeping it out of the driver’s direct line of sight. Ensure the lens has an unobstructed view and does not interfere with the car’s Advanced Driver-Assistance Systems (ADAS) cameras, sensors, or windshield wipers.
- Rear Camera: If using a dual-channel system, mount the rear camera at the top center of the rear hatch glass. Try to avoid placing adhesives directly over defroster lines, as removal could damage them. Ensure the camera’s view is clear.
Cable Management
Proper cable routing is crucial for a professional look and to prevent interference with vehicle safety features.
- Headliner: Gently tuck the cable into the gap between the headliner and the windshield.
- A-Pillar: Route the cable down the A-pillar (the pillar between the windshield and the front door). Critically, always run the cable alongside existing wire bundles or within designated channels, never directly across where side curtain airbags deploy. Many Teslas have specific channels or sufficient space to accommodate cables safely.
- Side Panels and Weather Stripping: Use a plastic pry tool to carefully tuck the cable under the door’s rubber weather stripping and along the side of the dashboard or center console.
- Concealment: Continue routing the cable to your chosen power source (USB port, 12V socket, or battery pack), keeping it hidden beneath floor mats or trim. Adhesive cable clips can help secure the cable in less visible areas.
Testing the Setup
After installation, always test your dash cam thoroughly:
- Power On/Off: Confirm the dash cam powers on when the car is active and, if using a battery pack, transitions to parking mode when the car turns off.
- Recording: Verify that both front and rear cameras (if applicable) are recording video and audio (if supported) at the correct resolution and angle.
- Parking Mode: If equipped, ensure parking mode (motion/impact detection) functions as expected.
- No Error Messages: Check your Tesla’s display for any unexpected error messages related to the 12V battery or other systems.
Top Dash Cam Features to Consider for Tesla Owners
When selecting an aftermarket dash cam for your Tesla, look for features that complement the vehicle’s capabilities and address the limitations of the built-in system:
- High Video Resolution: Opt for 2K (1440p) or 4K (2160p) resolution for crisp, detailed footage, making license plates and other crucial details easily readable.
- Wide Field of View: A wider lens (140-170 degrees) captures more of the road and surrounding areas, providing better coverage than Tesla’s integrated cameras.
- Advanced Parking Mode: Look for dash cams with buffered parking mode (records before and after an event) and intelligent power management to work seamlessly with an external battery pack. Features like motion and impact detection are vital.
- G-Sensor & GPS: A G-sensor automatically saves footage during impacts, while GPS provides location and speed data, which can be crucial evidence.
- Wi-Fi Connectivity: Allows you to easily view, download, and share footage wirelessly to your smartphone without removing the SD card.
- High Endurance Micro SD Card: Invest in a high-quality, high-endurance MLC (Multi-Level Cell) Micro SD card specifically designed for continuous recording. These cards are more durable and reliable under the constant write/erase cycles of a dash cam.
- Heat Resistance: Tesla cabins can get hot, so a dash cam designed to withstand high temperatures is essential for longevity.
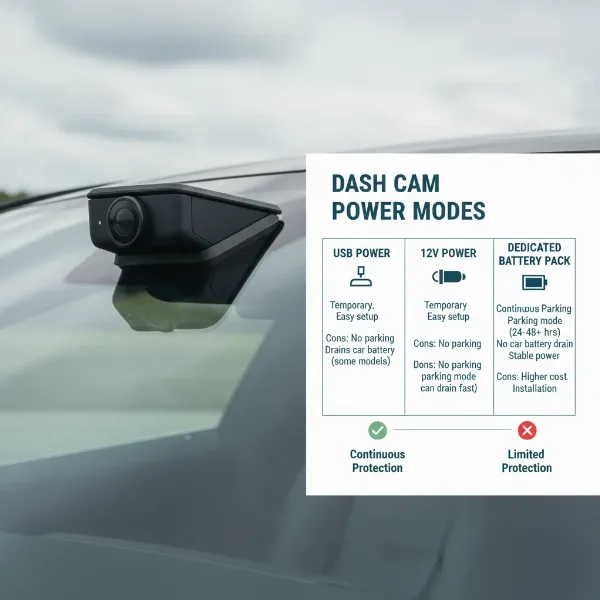 A modern dash cam installed discreetly on a Tesla windshield, with a comparison infographic of USB, 12V, and battery pack power options.
Conclusion
Installing an aftermarket dash cam in your Tesla is a smart investment that significantly enhances your safety and peace of mind on the road and when parked. While Tesla’s built-in dashcam offers basic functionality, a dedicated system provides superior video quality, broader coverage, and more reliable parking surveillance. For the most comprehensive protection and to ensure your Tesla’s electrical system remains undisturbed, leveraging a dedicated dash cam battery pack is the recommended approach for continuous parking mode.
By carefully considering your power source, choosing a dash cam with robust features, and following proper installation techniques for discreet cable routing, you can enjoy the ultimate security solution for your advanced vehicle. Are you ready to upgrade your Tesla’s surveillance and drive with confidence?
Frequently Asked Questions
Why do I need an aftermarket dash cam if my Tesla has one built-in?
Aftermarket dash cams often provide higher video resolution (2K or 4K), wider fields of view, audio recording, and more advanced, reliable parking modes compared to Tesla’s integrated system, which can have limitations in video quality and coverage.
Can I just use my Tesla’s USB ports to power an aftermarket dash cam?
While possible, Tesla’s USB ports, especially in the center console for newer models (post-Nov 2021), may be charge-only or power down when the car is off. This means simple USB power is generally not suitable for continuous parking mode recording, leaving gaps in your vehicle’s surveillance.
Is hardwiring a dash cam directly to my Tesla’s 12V battery a good idea?
Directly hardwiring to your Tesla’s small 12V accessory battery can quickly drain it, leading to limited parking mode duration (e.g., only a few hours) and potentially causing error messages. For Model 3, a traditional fusebox for hardwiring is often not present. A dedicated dash cam battery pack is usually a safer and more effective alternative for continuous power.
What is the best way to power a dash cam for continuous parking mode in a Tesla?
The most recommended method for continuous parking mode in a Tesla is using a dedicated dash cam battery pack. These packs charge while you drive and then power the Dash Cam independently when your car is off, preventing drain on your Tesla’s 12V battery and ensuring extended recording times.
Where should I route dash cam cables in my Tesla for a clean installation?
Cables should be carefully tucked along the headliner, down the A-pillar (avoiding airbags by routing along existing wire bundles), under door weather stripping, and behind trim panels. Use plastic pry tools to safely tuck and conceal wires, ensuring they do not interfere with vehicle components or safety systems.